Article · Sep 10, 2023
How to configure Stripe Checkout Integration in the Bubble.io application without any Paid Plugins?
Know How to configure, initiate and capture payment with Stripe checkout in the Bubble.io application without a paid plugin?
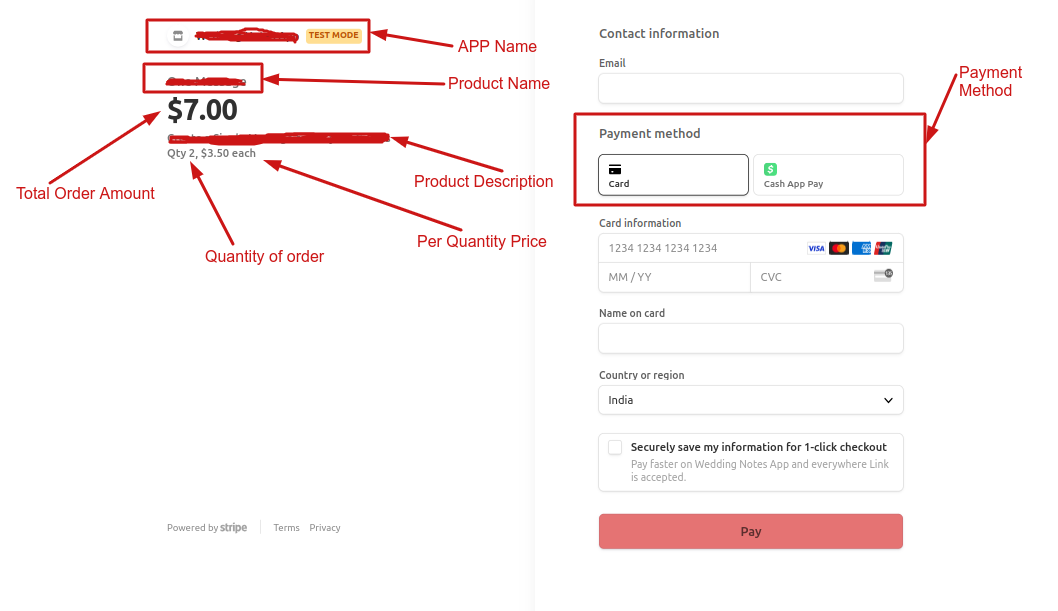
At the time of checkout, a basic requirement is a checkout session that captures the payment like this:

This kind of checkout doesn’t come with a free Bubble.io Plugin. So Let’s do this with Bubble API Connector with the following steps:
-
Setup Stripe Standard Business Account
-
Add Product in Stripe
-
Stripe API Call Setup in Bubble app
-
Stripe Checkout Workflow Actions with Redirection to checkout Page
-
Bubble Webhook Creation and setup in Stripe
Capture the successful transaction
Step 1: Setup Stripe Standard Business Account:
- If you do not have a Stripe account, the First Step is to set up a Stripe Standard Business Account at stripe.com.
Step 2: Add Product in Stripe:
-
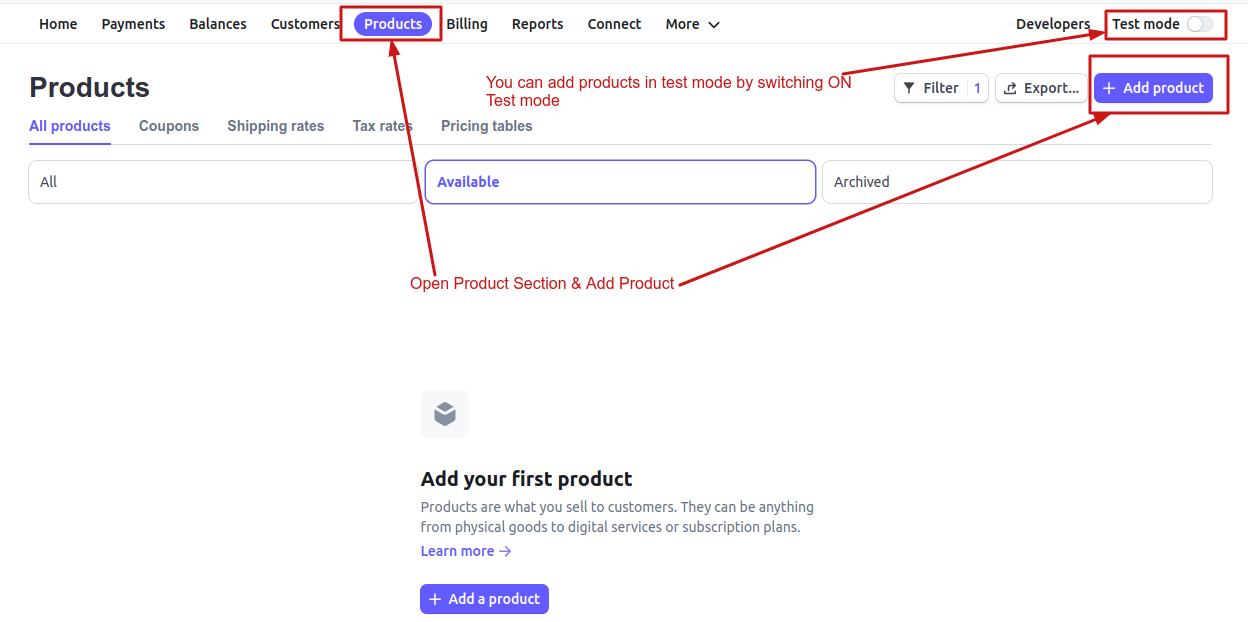
In your stripe account, Switch on Test mode, go to the product section and add a new product.
-
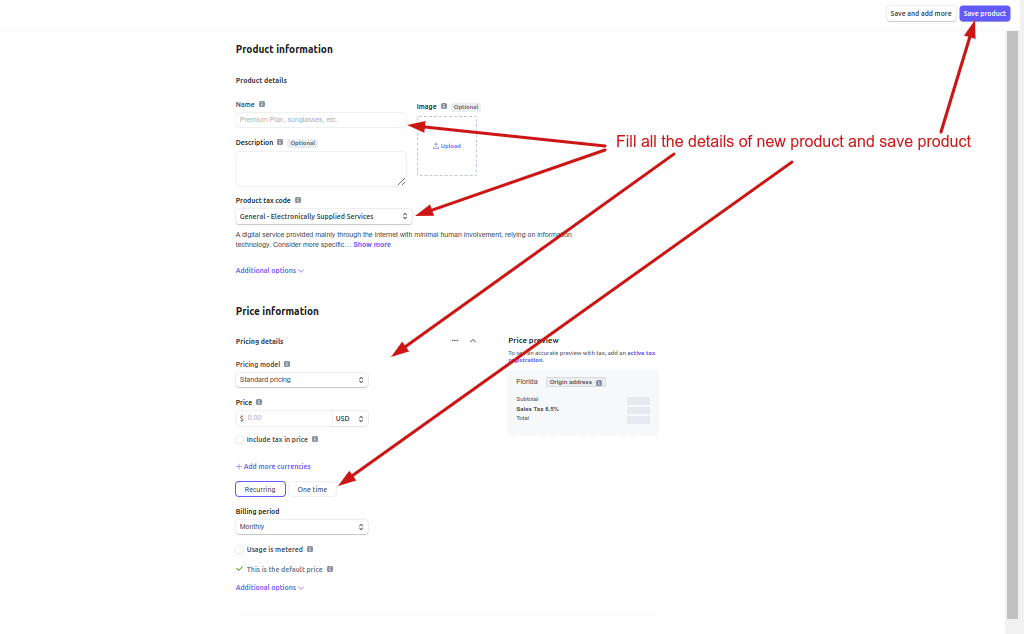
Add Product name, category of product, currency, per quantity price etc. necessary details and save the product.
-
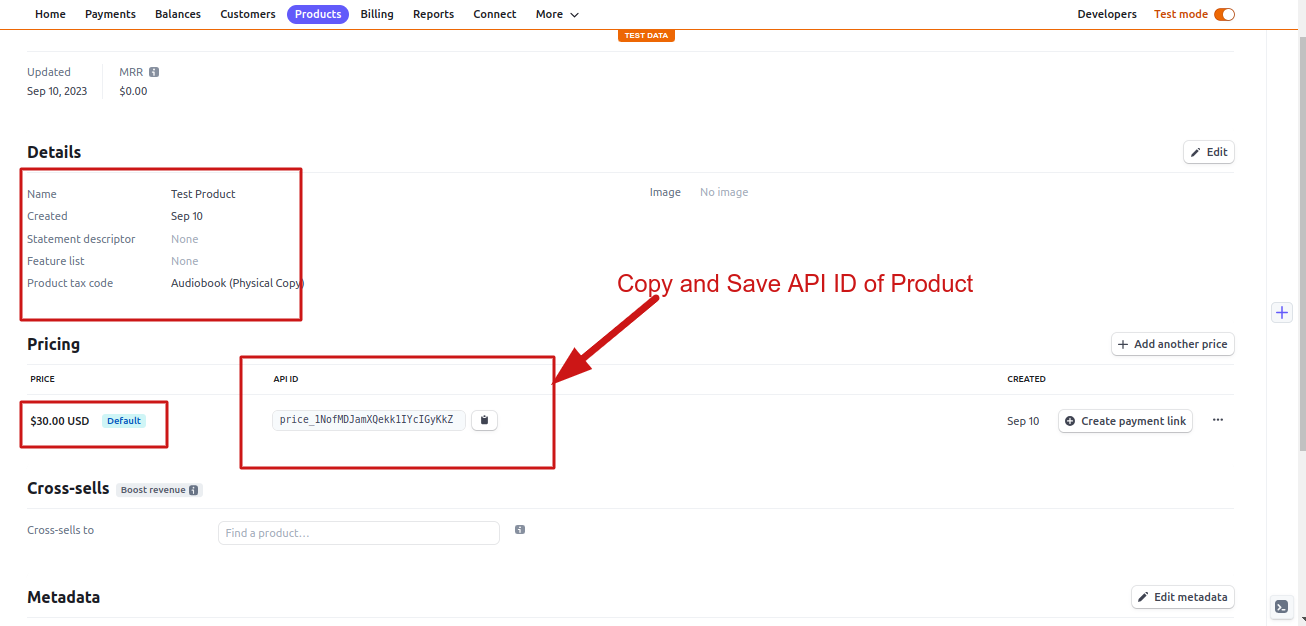
Once you save the product, Open the details and save the API ID of the product somewhere which will be needed in the bubble app.
Step 3: Stripe API Call Setup in Bubble Application:
-
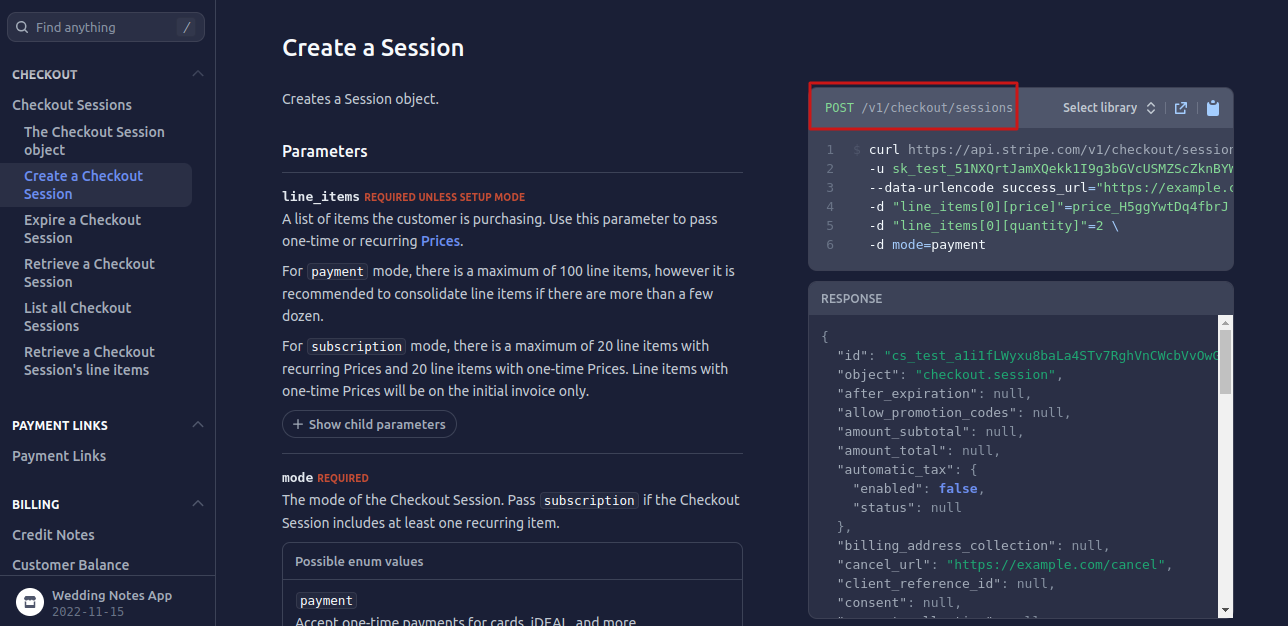
For stripe checkout API, Go to the Stripe API Documentation at https://stripe.com/docs/api/checkout/sessions
-
For the purpose of this use case, we will use the ‘create a checkout session’ API endpoint
-
-
You will need a secret API Key from the Developers tab to set API Call in the bubble:
-
With All these, here is the Stripe checkout API call in Bubble will look like
-
Let’s look at important aspects of API Call
- Authentication: You have to provide the secret key with the ‘Bearer ’ prefix.
- Use ‘Content-Type: Application/json’ in shared headers for all calls.
- In the checkout session, use as ‘Action’ because you are going to use it as workflow action.
- In the call, Use ‘Content-Type: x-www-form-urlencoded’ in header parameters and make it private.
- In body parameters, ‘success-url’ writes the URL to redirect after payment is successful.
- The ‘line_items[0][price]’ key should have the parameter of product API ID which we saved previously in Step no. 2.
- I am adding ‘client_reference_id’ to pass the unique ID of the user whom we are redirecting to stripe checkout. The purpose of this is to capture the successful payments to create orders that will visit Step no 6.

- Passing all body parameters as ‘querstring’ which is very crucial for this API call
Note: Parameters are querystring parameters that are added to the end of the URL in an API call. These values are variable and provide the Server with further information to determine the specific data or action requested. Parameters common to all the calls can be provided here instead of individually in each call.
Step 4: Stripe Checkout Workflow Actions with Redirection to checkout Page:
-
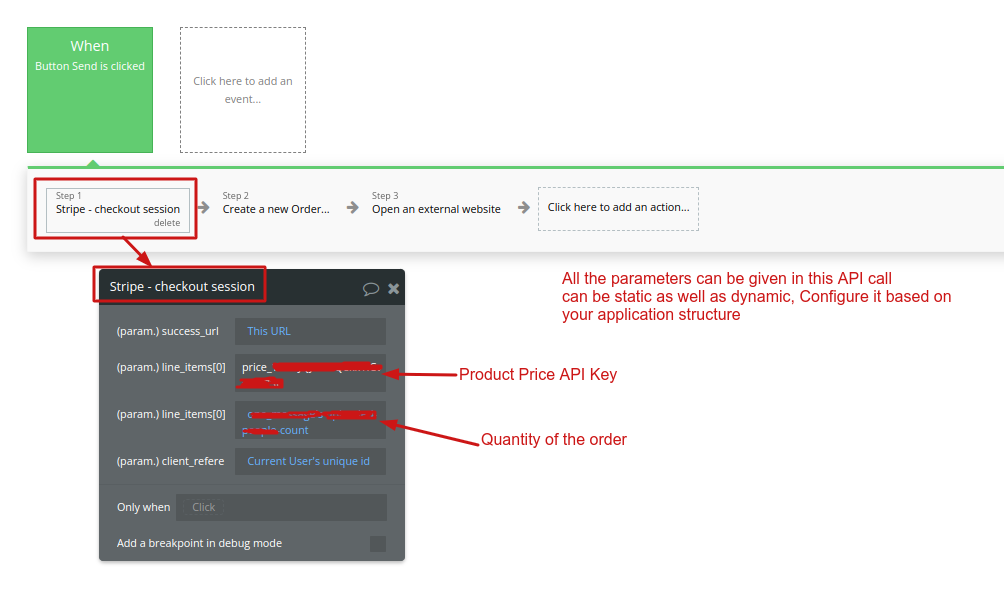
On click of the button to initiate checkout, the first action is to create a checkout session and pass success_url, Product API key, Quantity of the order, and Client_reference_id as a static or dynamic value based on your bubble app architecture
-
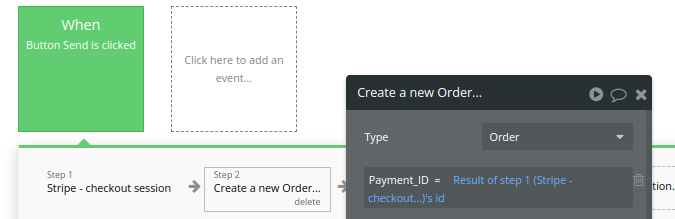
The next step is to create an order in which provides all the parameters to do necessary actions after payment is successful because you cannot trigger those actions here. Those actions will be triggered in backend workflows which we will see in Step no. 6.
-
I record the payment ID and add a boolean field of ‘Payment successful’ field which I mark default as ‘no’ which means until this bubble app captures successful payments, the status of payment will always be failed and nothing can proceed further until payment successful status is yes.
-
The last step is to redirect from your application to the stripe checkout URL which you will get from step 1 and it will be like this
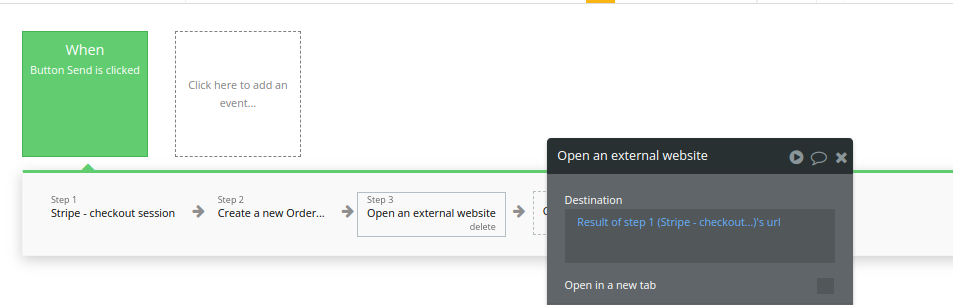
And Vola!, You are at the stripe checkout page which will look like we have seen it at the beginning of this article
Now because this checkout page is out of your bubble application domain, you will need a mechanism to verify whether payments are successful or not. Next Step no 5 and 6 are about that.
Step 5: Bubble Webhook Creation and Setup in Stripe:
-
Now for this, you will need at least the first paid plan of bubble.io as Bubble webhooks can only be created in backend workflows and backend workflows will only be enabled in the paid plan as of now.
-
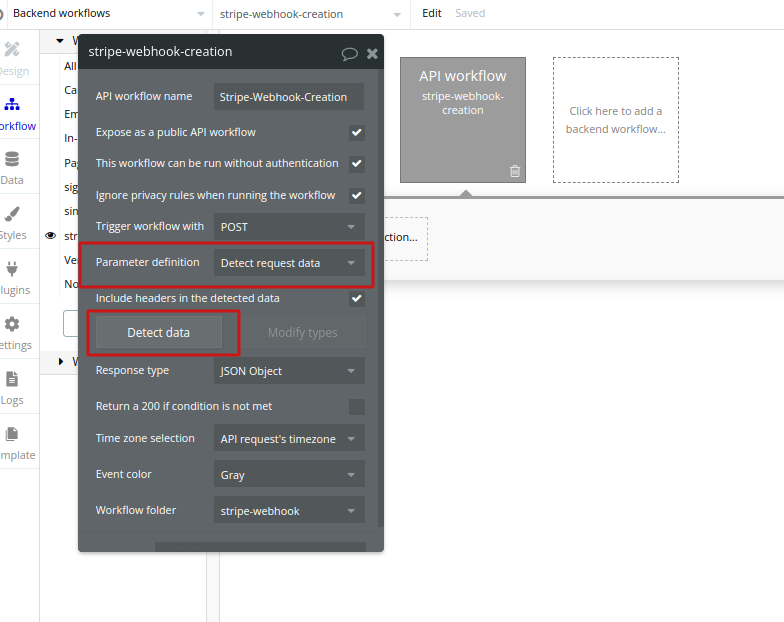
Go to Backend Workflow and create ’ A New API Workflow’ and name it ‘Stripe-Webhook-Creation’ and set it like the below
-
Now click on Detect Data and you will see the webhook for your bubble application. First, you need to initialise the webhook which is why ‘/initialise/’ is something that you will find in a webhook like this.
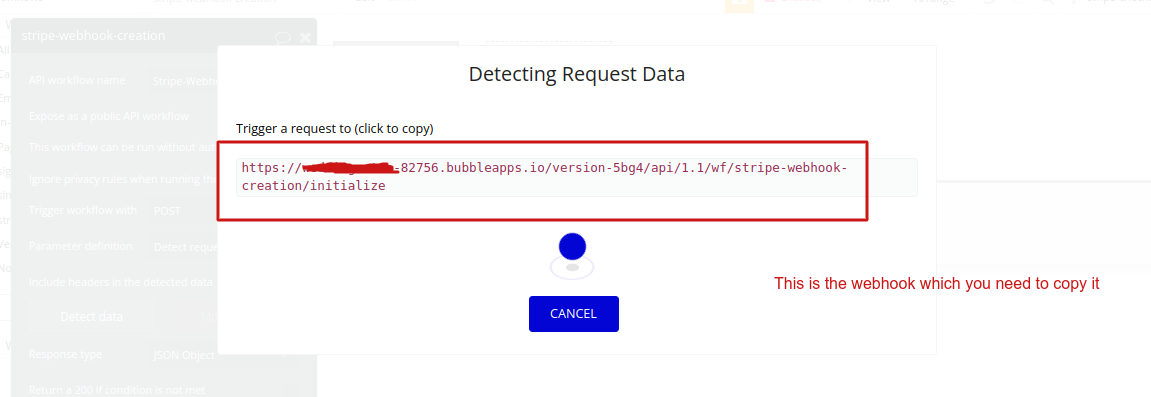
Now add this webhook in the stipe ->Developers ->Webhooks ->Add Endpoint

-
After clicking on ‘Add endpoint’, add webhook in ‘EndPOint URL’
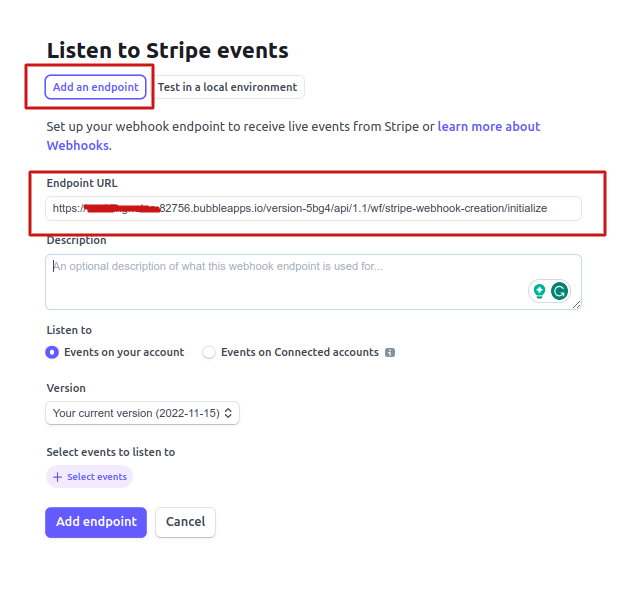
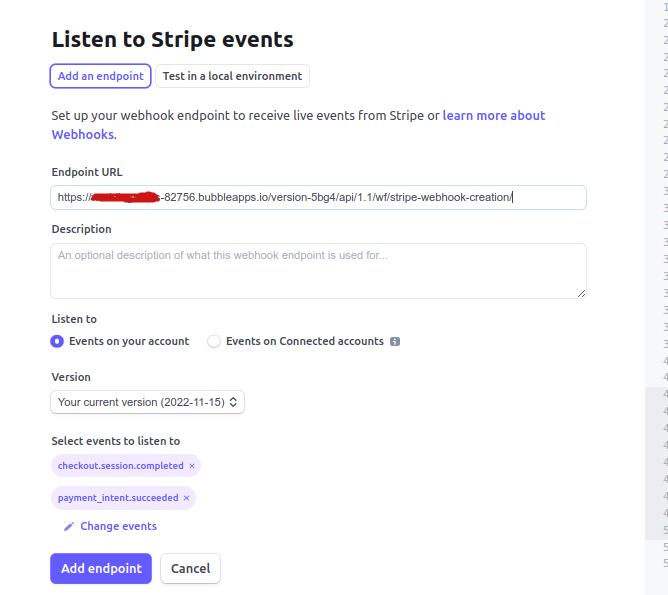
- Now select events to listen to and for the purpose of this use case, choose 2 events, one for successful payment and the second for a successful checkout session
Step 6: Capture the successful transaction:
-
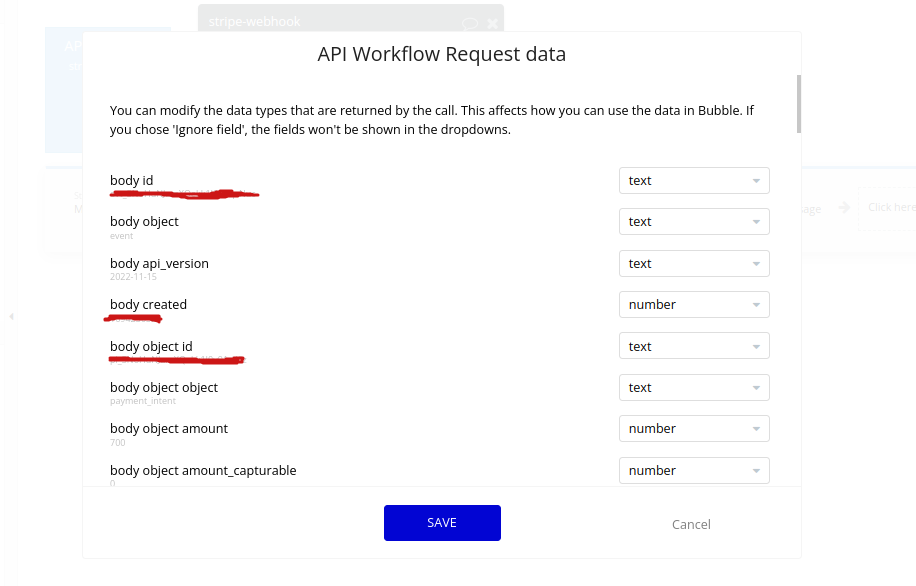
Now, Go to your bubble application front end ‘preview’ and make a successful transaction with stripe test credit card number ‘4242 4242 4242 4242’, After a successful transaction, your webhook will be initialised and will provide a response which you need to save
Now this webhook is initialised, remove ‘/initialise’ from the endpoint in Stripe and it will look like this
-
Now add workflow actions to identify orders based on the payment ID and client_reference_ID we have used in Step No. 3
-
Make the ‘Payment Successful’: Yes in DB and initiate the further processes after successful payment/subscription.
This is how you implement stripe checkout integration in the Bubble.io application without any Paid Plugins.
Frequently asked questions
Do I need a paid plugin to integrate Stripe Checkout in Bubble.io?
No. Bubble's free Stripe plugin does not include a hosted Checkout flow, but you can build one yourself with the native API Connector and a backend webhook. The Stripe side is unchanged (you call the standard "Create a Checkout Session" endpoint with a Bearer token), and the Bubble side is a single API workflow plus a webhook receiver. You do need at least Bubble's cheapest paid plan because backend workflows (which is where the webhook lives) are gated behind paid tiers.
How do I set up a Stripe webhook in Bubble.io?
Create a backend workflow in Bubble (Settings has to allow API workflows first), name it something like stripe-webhook-creation, and click "Detect data" so Bubble shows you the unique webhook URL for that workflow. The URL initially contains /initialize/. Paste this full URL into Stripe Dashboard at Developers, Webhooks, Add endpoint, then trigger one real test transaction so the webhook initializes and Bubble can learn the response shape. After initialization, edit the Stripe endpoint to remove /initialize/ from the URL and select the events you want (typically checkout.session.completed and payment_intent.succeeded).
What is client_reference_id and why does the integration need it?
client_reference_id is a custom string field Stripe accepts on the create-Checkout-Session API call and echoes back on every webhook event for that session. The integration uses it to map a successful Stripe payment back to the right Bubble user or order, because Stripe's checkout page lives outside your Bubble domain and the webhook is the only way you find out the payment succeeded. Pass the user's Bubble unique_id (or an order ID) as client_reference_id when you create the session, then read it from the webhook payload to mark the right record as paid.
Why pass body parameters as querystring in the Bubble Stripe API call?
Stripe's Create Checkout Session endpoint expects parameters in the form-encoded body, not JSON. In Bubble's API Connector, the way to send form-encoded data is to use the "querystring" parameter type and set the Content-Type header to application/x-www-form-urlencoded. If you send the same parameters as JSON, Stripe rejects the request with a 400 because the line_items[0][price] bracket-notation does not survive JSON serialization. Querystring + form-urlencoded is the only combination that produces a request Stripe will accept.
Do I need a paid Bubble plan to use this Stripe integration?
Yes, the cheapest paid plan or higher. Stripe Checkout itself works on any tier (the front-end button and redirect-to-Stripe portion uses on-page workflows that are available on free tier), but you cannot capture the successful payment without a backend webhook, and backend workflows are paid-only. Without the webhook, you have no way to know whether the payment actually succeeded after Stripe redirects the user back to your success_url, because the user could close the tab or the redirect could fail; the webhook is the source of truth.
How do I capture a successful payment from Stripe Checkout in Bubble?
Inside the backend workflow that receives the Stripe webhook, read the client_reference_id from the webhook payload, do a Search for the matching order or user record in your Bubble database, and update its "Payment Successful" boolean to yes. Then trigger any post-payment logic (send a receipt, provision access, mark subscription active). Treat the webhook as the source of truth, not the success_url redirect, because the redirect is best-effort and the webhook is guaranteed-delivery.