Article · Jul 27, 2024
How to implement OAuth 2 in Bubble?
OAuth2 in Bubble.io via the API Connector: authorization code flow, token exchange, and storing the access token. Full walkthrough using Salesforce CRM as the example.
What is OAuth 2?
OAuth 2 is a way for apps to get permission to access your information without needing your password. It uses tokens, which are like temporary keys, to give specific access to your data. Imagine a valet key for your car that only allows driving, not accessing the trunk. This keeps your main password safe and only grants limited access. It’s widely used by services like Google, LinkedIn, Salesforce, Zoho, and Facebook to let other apps connect securely.
How to start? With basic setup
For this, let’s take an example of Salesforce CRM. Why? because there is already too much content for Google and Facebook. lol :) and on a serious note, the Concept of OAuth 2 is the same for all.
Create an account on the Salesforce website, verify your email address, and fill in all basic information. Open Salesforce OAuth API Documentation in another tab.
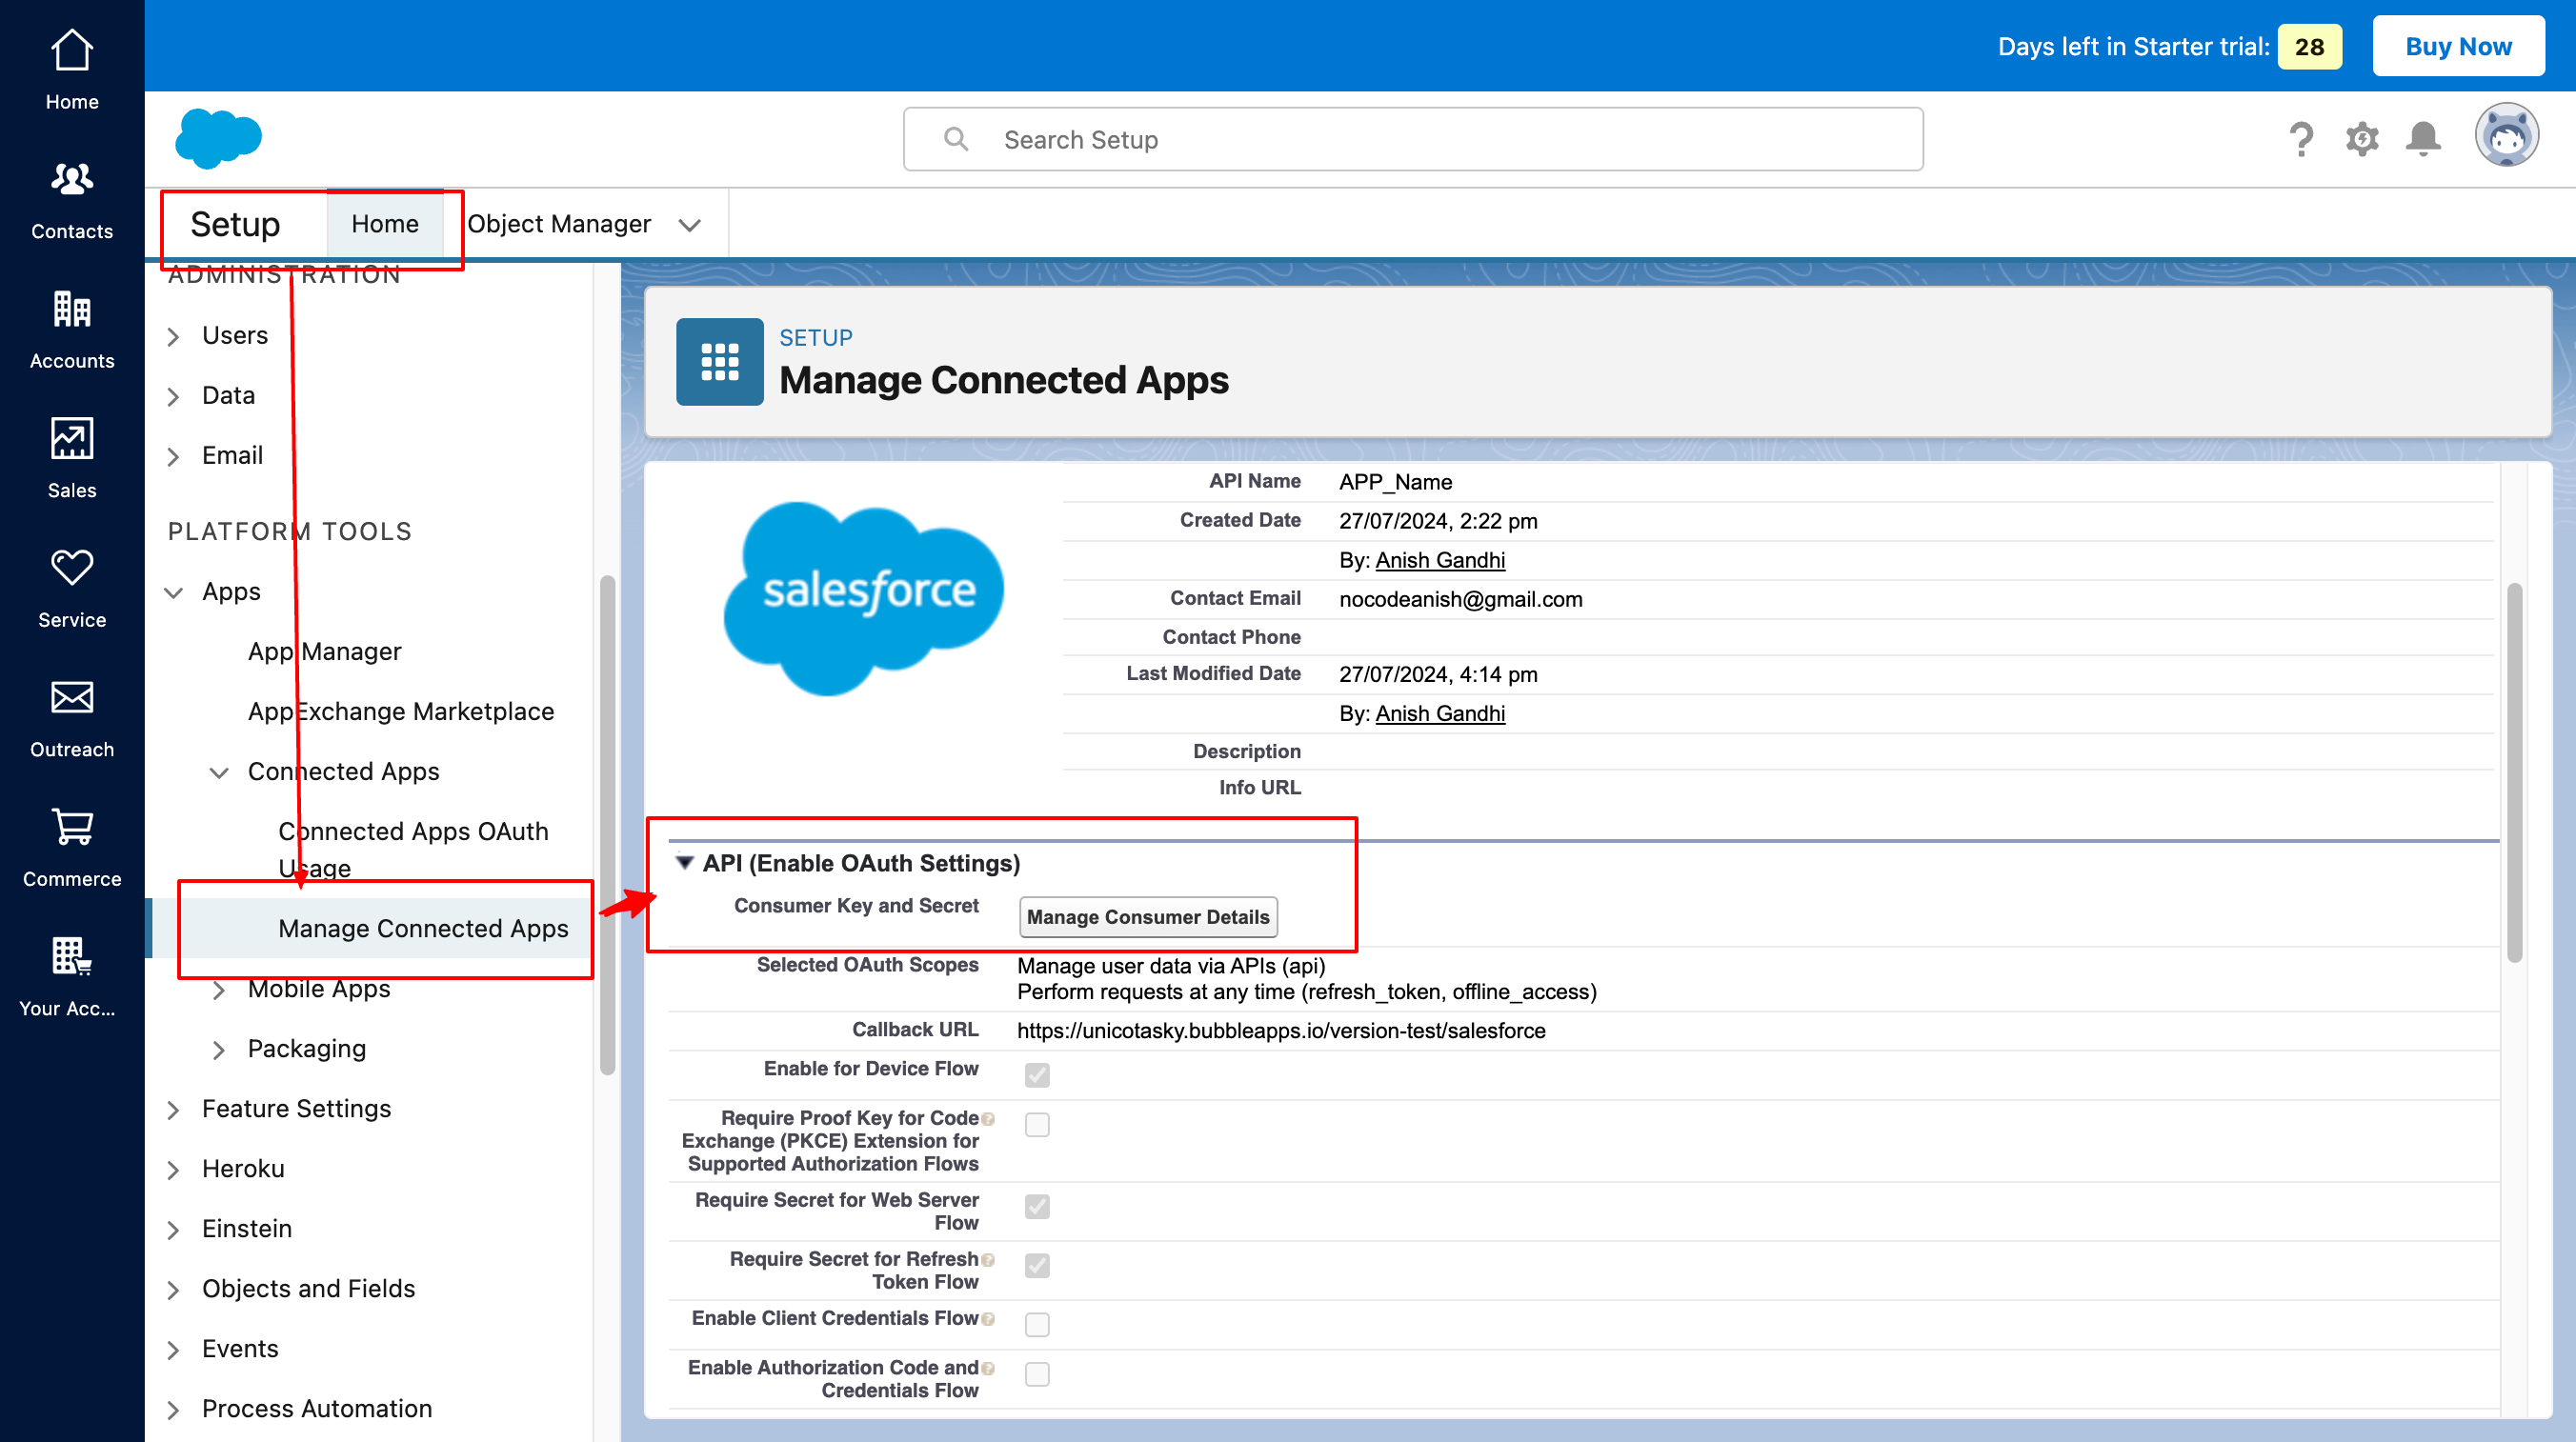
Now Go to Settings -> Open Advance Setup -> Home -> APPs -> APP Manager -> New Connected APP
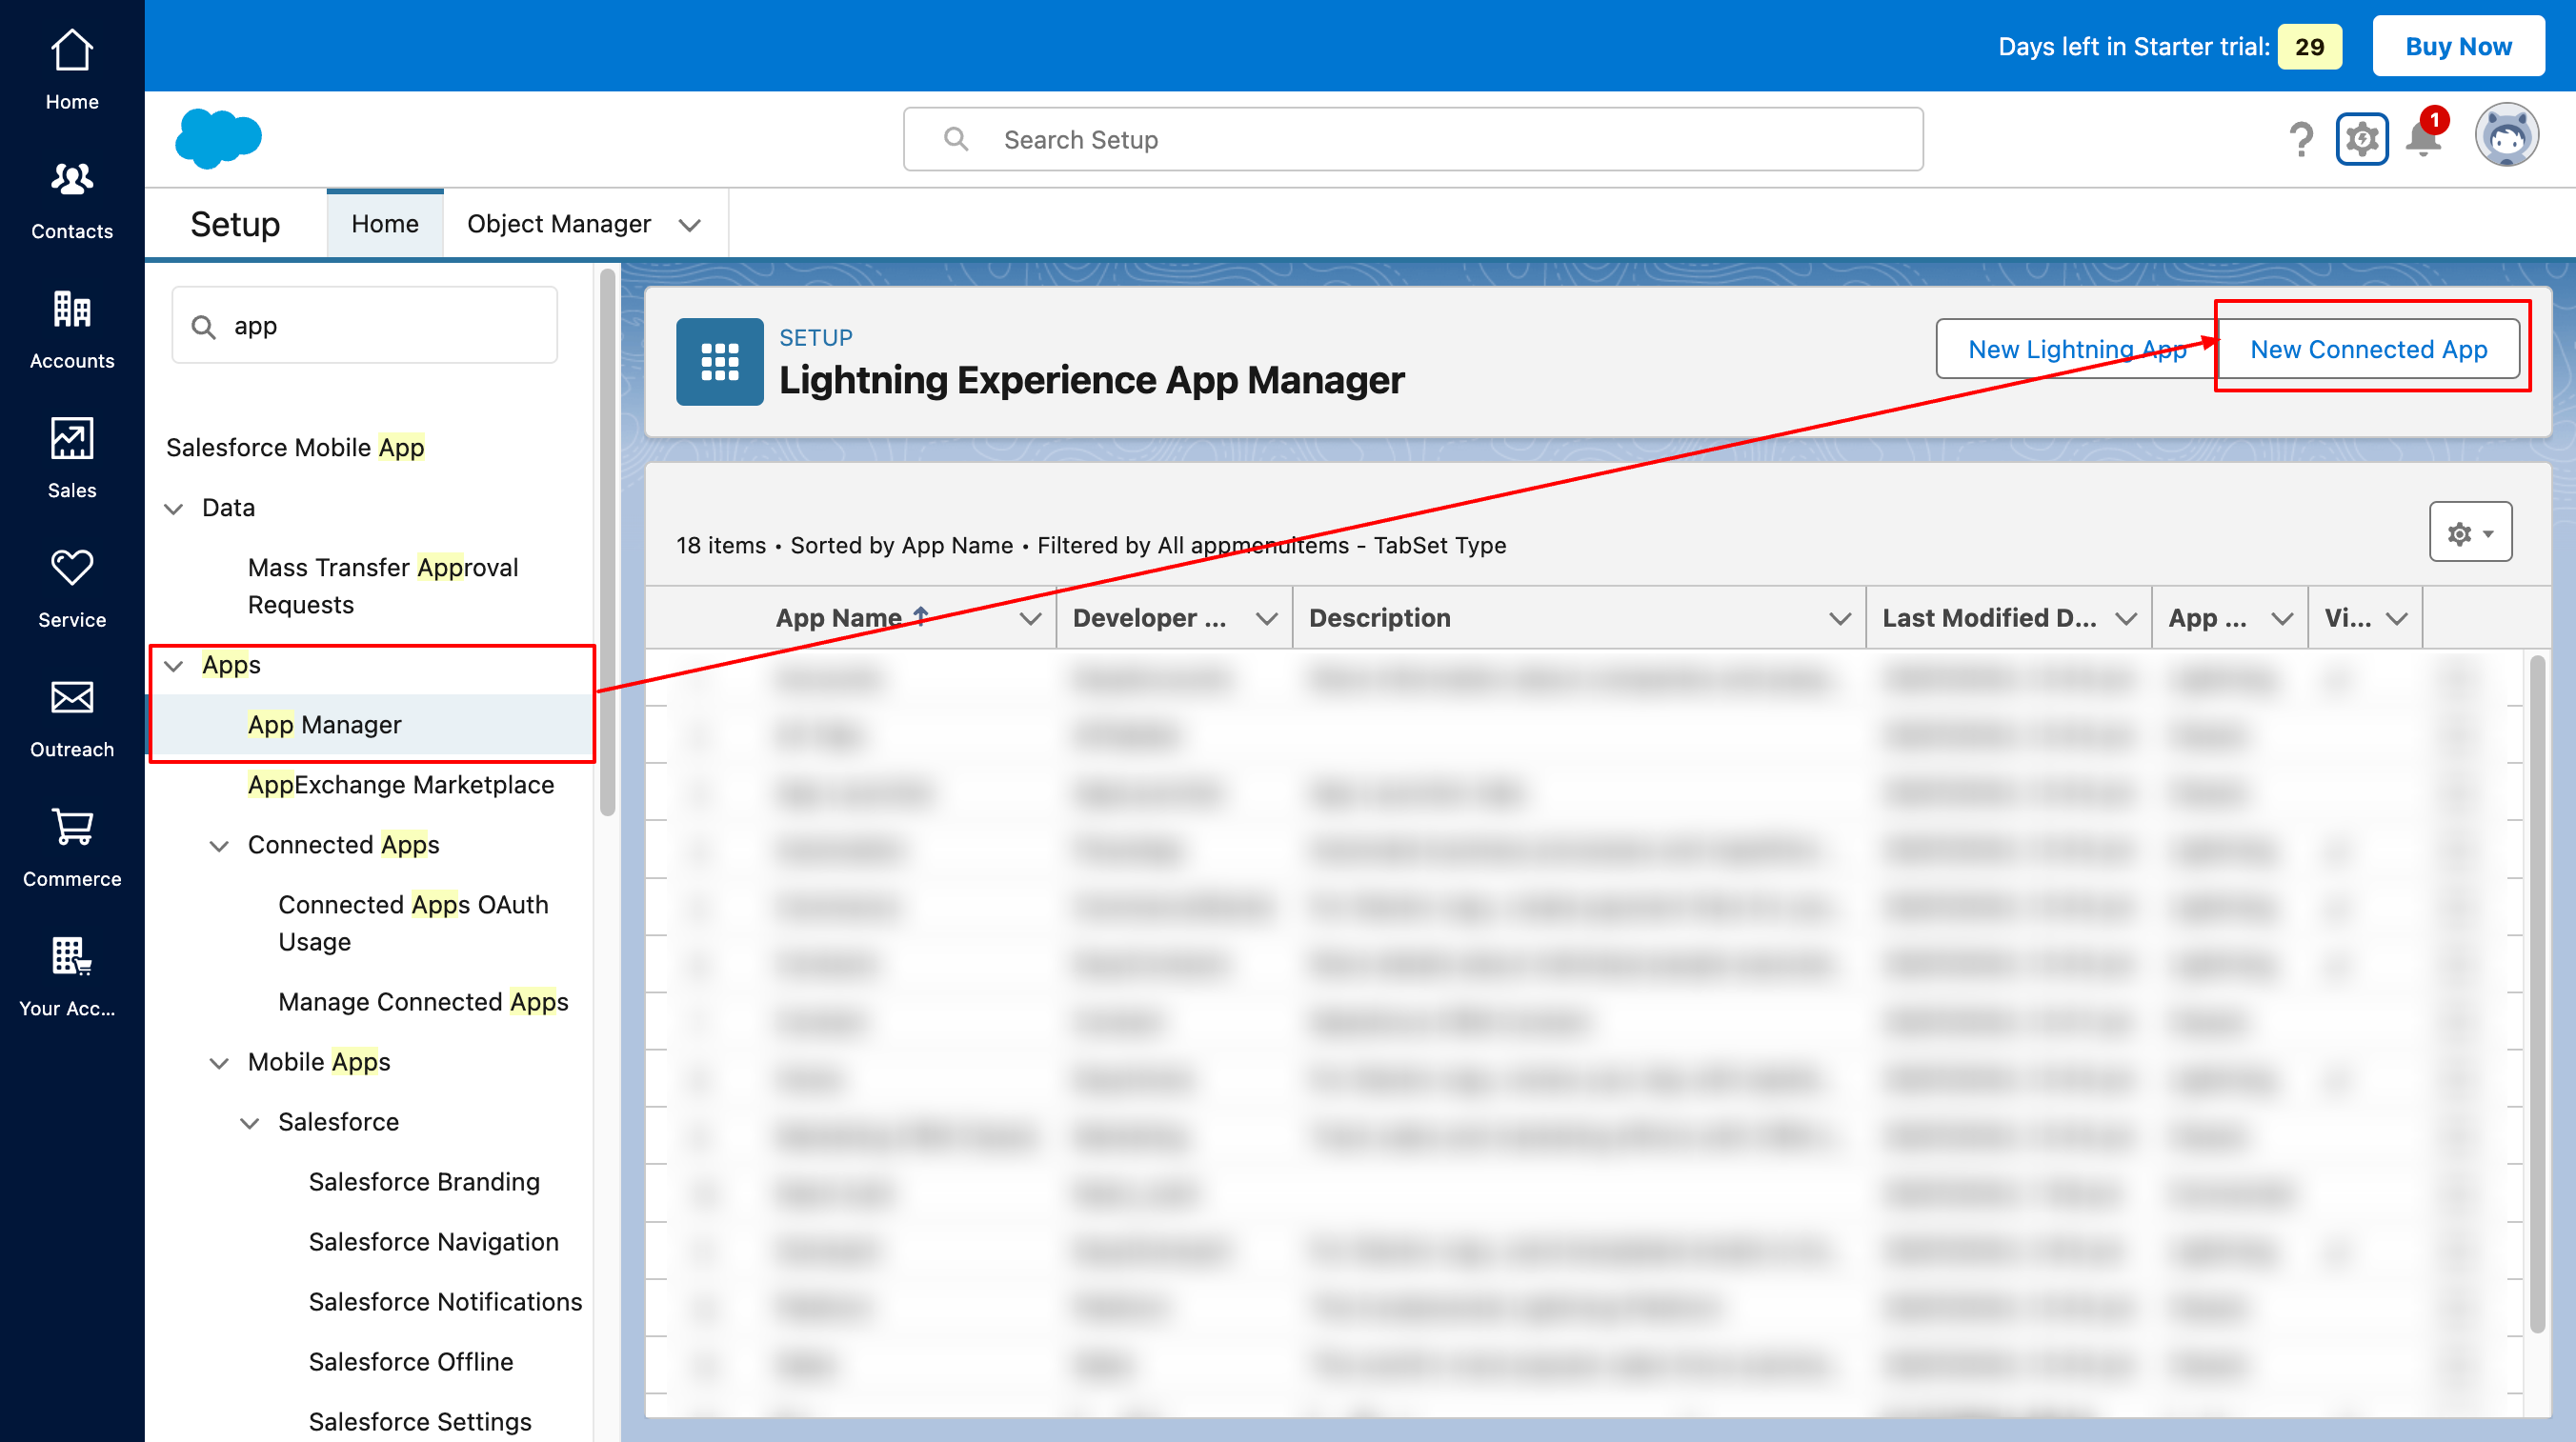
Then set up your new application like I have mentioned below:
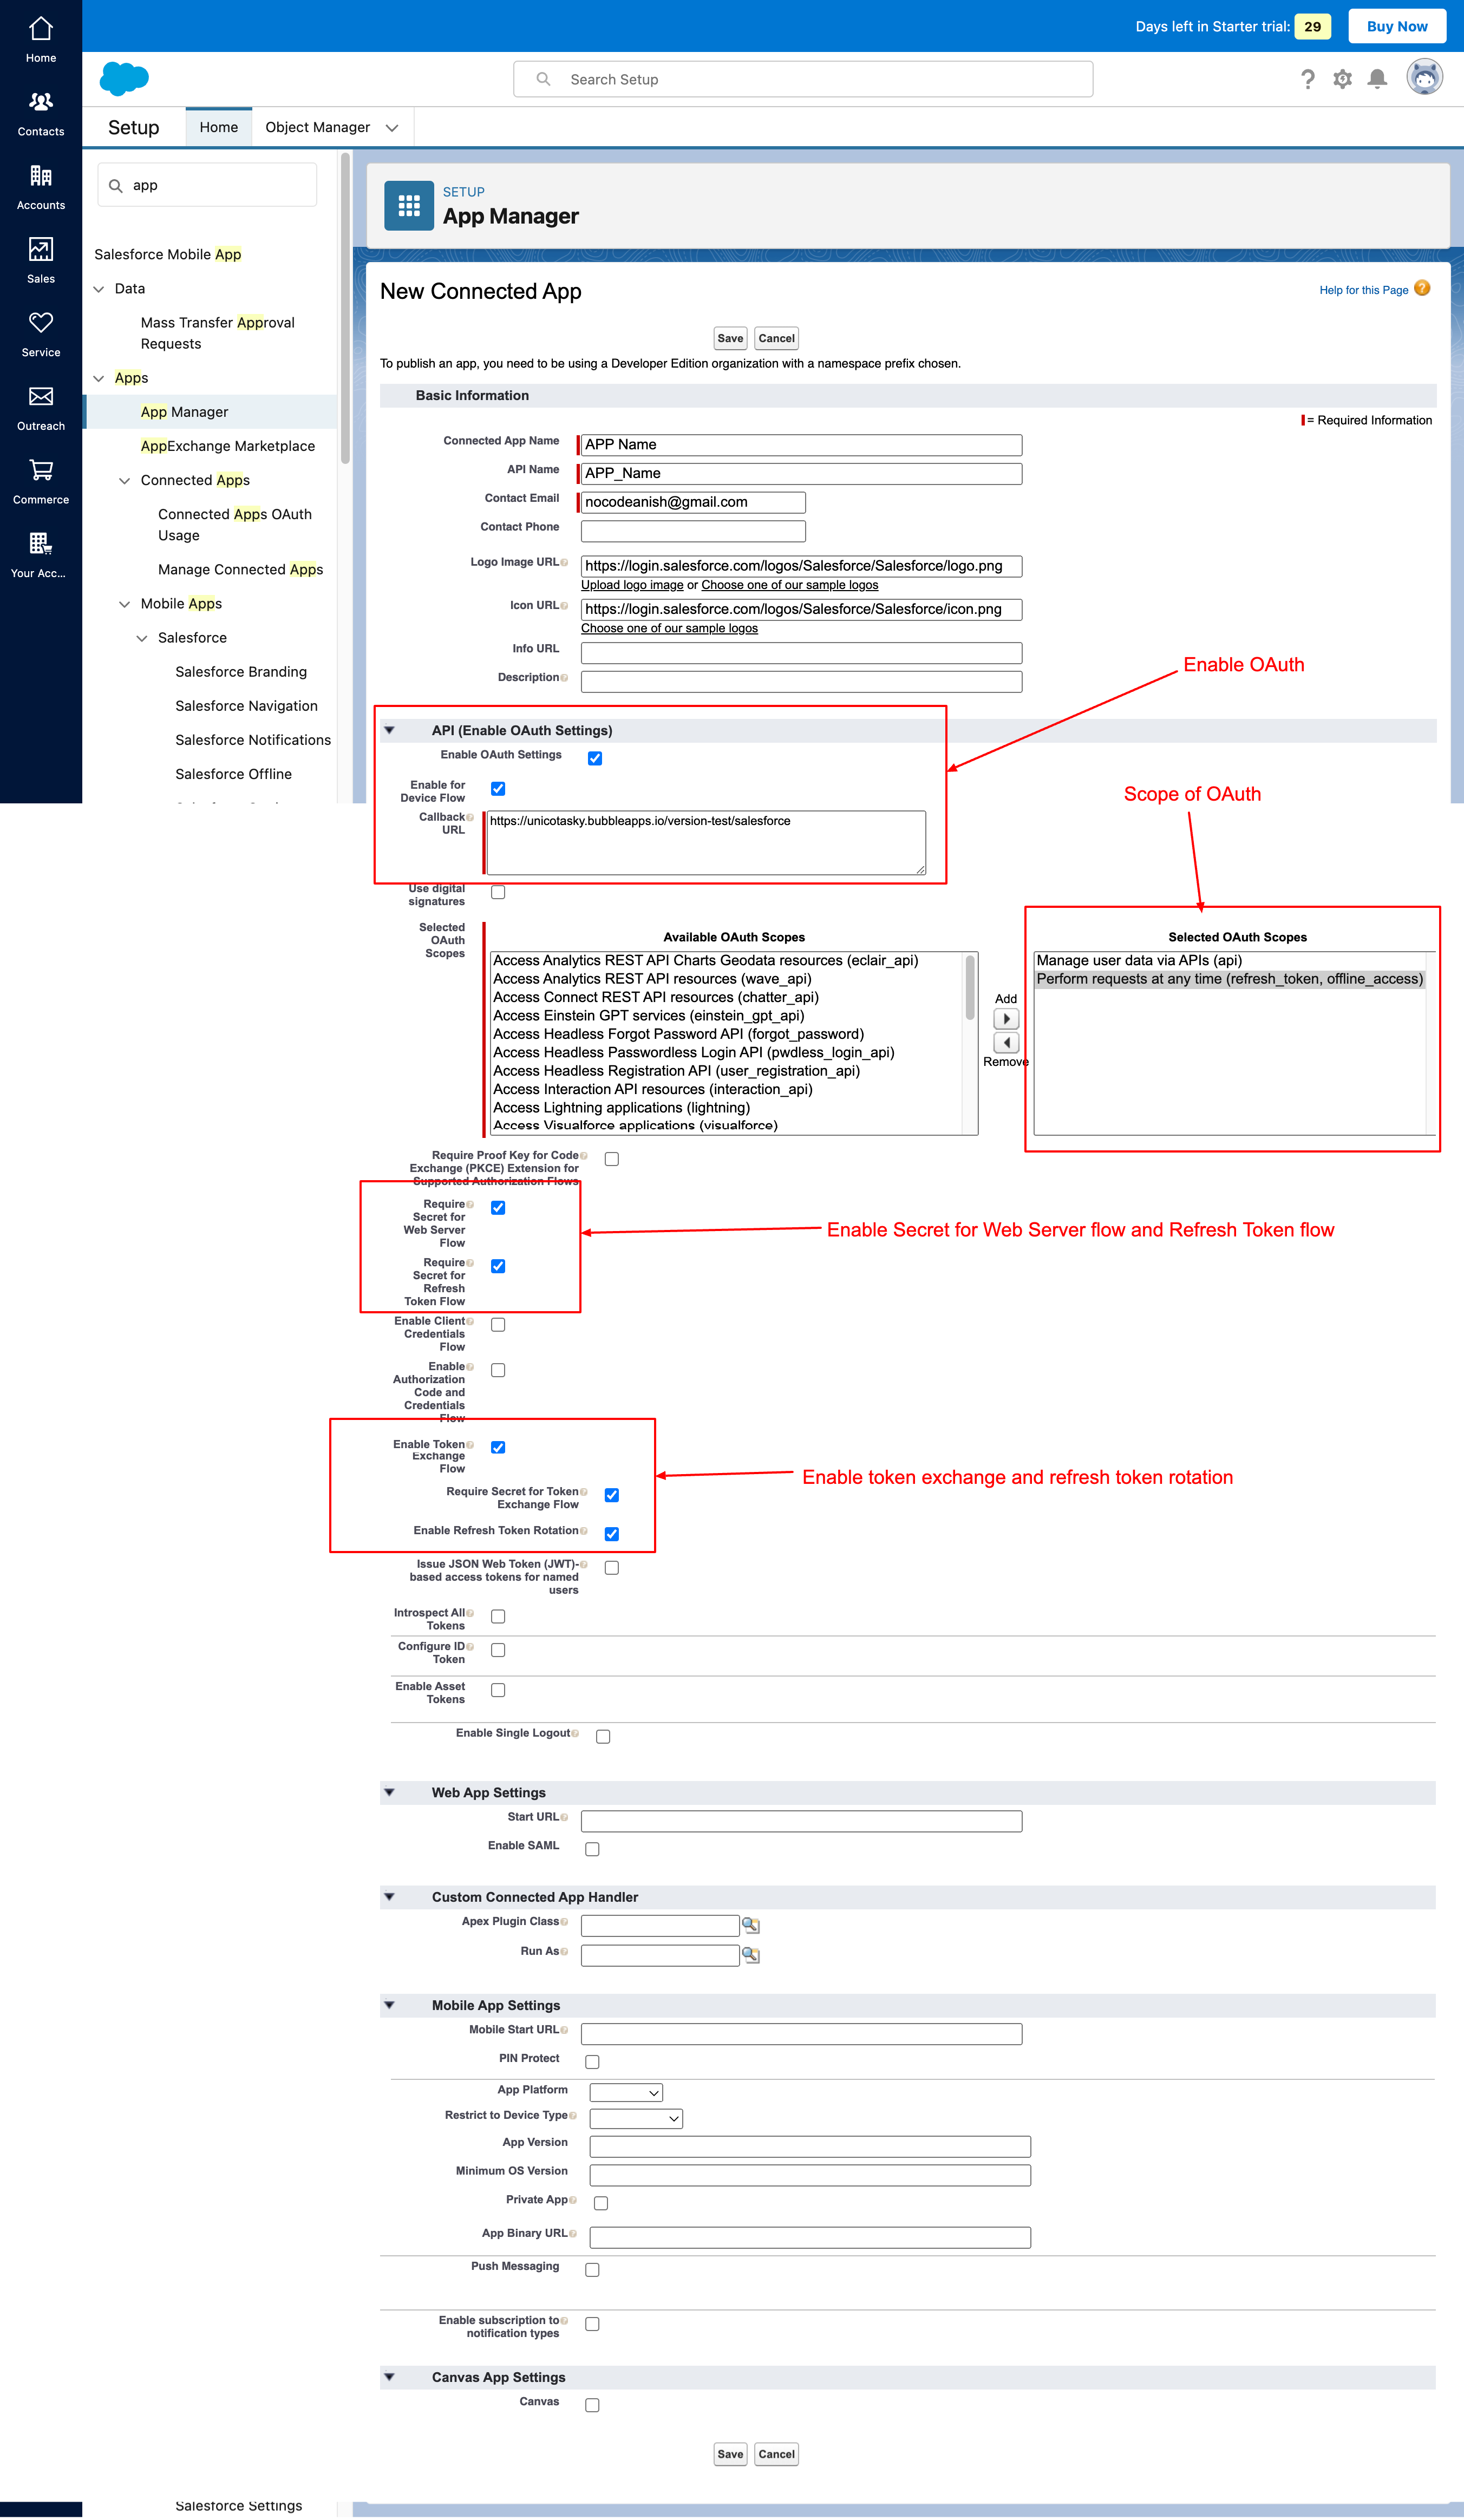
Now Here is some concept clarification:
How does this OAuth 2 flow work?
-
The bubble app will request an authorization code
-
Salesforce will either accept or deny the request and redirect the user to redirect URI
-
If Accepted, the redirect URI will have an authorization code as a query parameter
-
Based on the authorization code, the bubble app will ask for a token exchange
-
In exchange for the authorization code, the bubble app will receive an access token and a refresh token
-
Based on the access token, the bubble app will ask for details authorized in the API Scope
-
the access token will expire
-
bubble app will ask for details next time and if the access token is expired, bubble app will use a refresh token to get a new access token and ask for details again via a new access token
Let’s make ourselves familiar with the basic definitions of keywords we are going to use.
What is redirect URI?
In OAuth 2, a redirect URI (Uniform Resource Identifier) is the URL to which the authorization server sends the user back after they have granted or denied permission to the application. It acts as a callback URL where the authorization code or access token is sent. This URI must be pre-registered with the authorization server to ensure the response is sent to a trusted destination, enhancing security. It’s like a return address on a letter, telling the server where to send the response. This address must be registered in advance to ensure it’s safe and trusted.
What is an authorization code?
An authorization code in OAuth 2 is a short-lived code that an app receives after a user grants permission. The app exchanges this code for an access token, which it uses to access the user’s data. This process keeps the user’s credentials secure because the app never sees the user’s password directly.
What is an access token?
An access token in OAuth 2 is a security credential that allows an app to access a user’s data from another service. After the user grants permission, the app receives this token and uses it to make authorized requests. It’s temporary and limited to specific actions, ensuring secure and controlled access to the user’s information. The app uses this key to do specific things, like read your emails or access your photos, without needing your password. It’s temporary and only works for the actions you allow via scope.
What is a refresh token?
A refresh token in OAuth 2 is a special token that allows an app to obtain a new access token after the current one expires. This helps the app maintain access to the user’s data without needing them to log in again. It’s used to ensure continuous and secure access over a longer period.
What is the scope in OAuth 2?
In OAuth 2, a scope is a parameter that specifies the level of access the app is requesting from the user. It defines what actions the app can perform and what data it can access. For example, a scope might allow an app to read your emails but not send them. This helps users understand and control what permissions they are granting to the app.
What is client ID in OAuth 2?
In OAuth 2, a client ID is a unique identifier assigned to an app when it registers with an authorization server. It’s used to identify the app requesting the OAuth flow. Think of it like a username for the app, which helps the authorization server know which app is requesting access to user data.
What is client secret in OAuth 2?
In OAuth 2, a client secret is a confidential key assigned to an app when it registers with an authorization server. It’s used along with the client ID to authenticate the app and ensure that the request is coming from a trusted source. Think of it like a password for the app, helping to keep the communication secure.
You can find the client ID and secret in the manage connected app section of settings shown below
What does content type as application/x-www-form-urlencoded mean?
The content type application/x-www-form-urlencoded indicates that data sent in an HTTP request is encoded as key-value pairs, separated by & and with each key and value separated by =. This format is commonly used when submitting form data via HTTP POST requests. For example, name=John&age=30 is a typical representation of this content type.
How to Setup up OAuth API calls in Bubble APP?
Step 1: Request authorization code
Here is the API doc link for this.
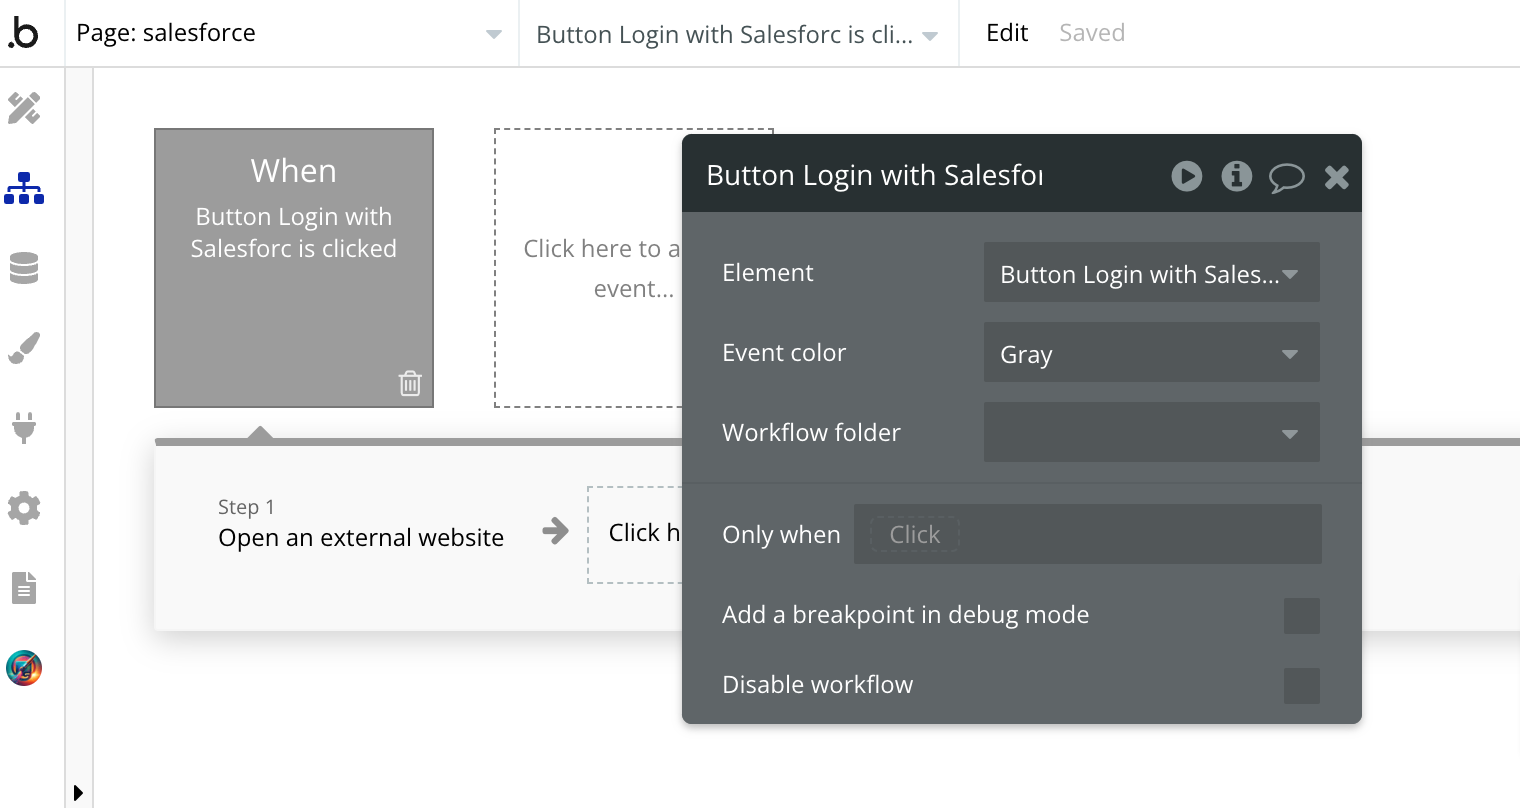
In the bubble app, Create a button from which you need to initiate authorization and create the action ‘Open an external website’. The destination will be similar to that shown in the image below

Now ‘MyDomainName’ is the same as your salesforce account subdomain which you can see in the URL when you open your your salesforce account.
When the user clicks on this button, the bubble app will redirect you to this URL and it will ask you to log into a Salesforce account then it will redirect to redirect URI you had set up and added in the button link.
This URL will have a query parameter named ‘code’. For me, it was like this: https://unicotasky.bubbleapps.io/version-test/salesforce?code=aPrxI5eherH6PXZaIC0jwHd4esNOZqUHE_ub76CHD.JJj5W5iU54fhOCG87qYsSA3d8e65UtOA%3D%3D
Step 2: Request access token
Now we have to set up the request access token. Here is the Salesforce API Doc
The header will have the content type as application/x-www-form-urlencoded
Body parameters will have grant_type(static), code(dynamic), client_id (static), client_secret(static) and redirect_url(static).
In the Bubble API connector, it will look like this
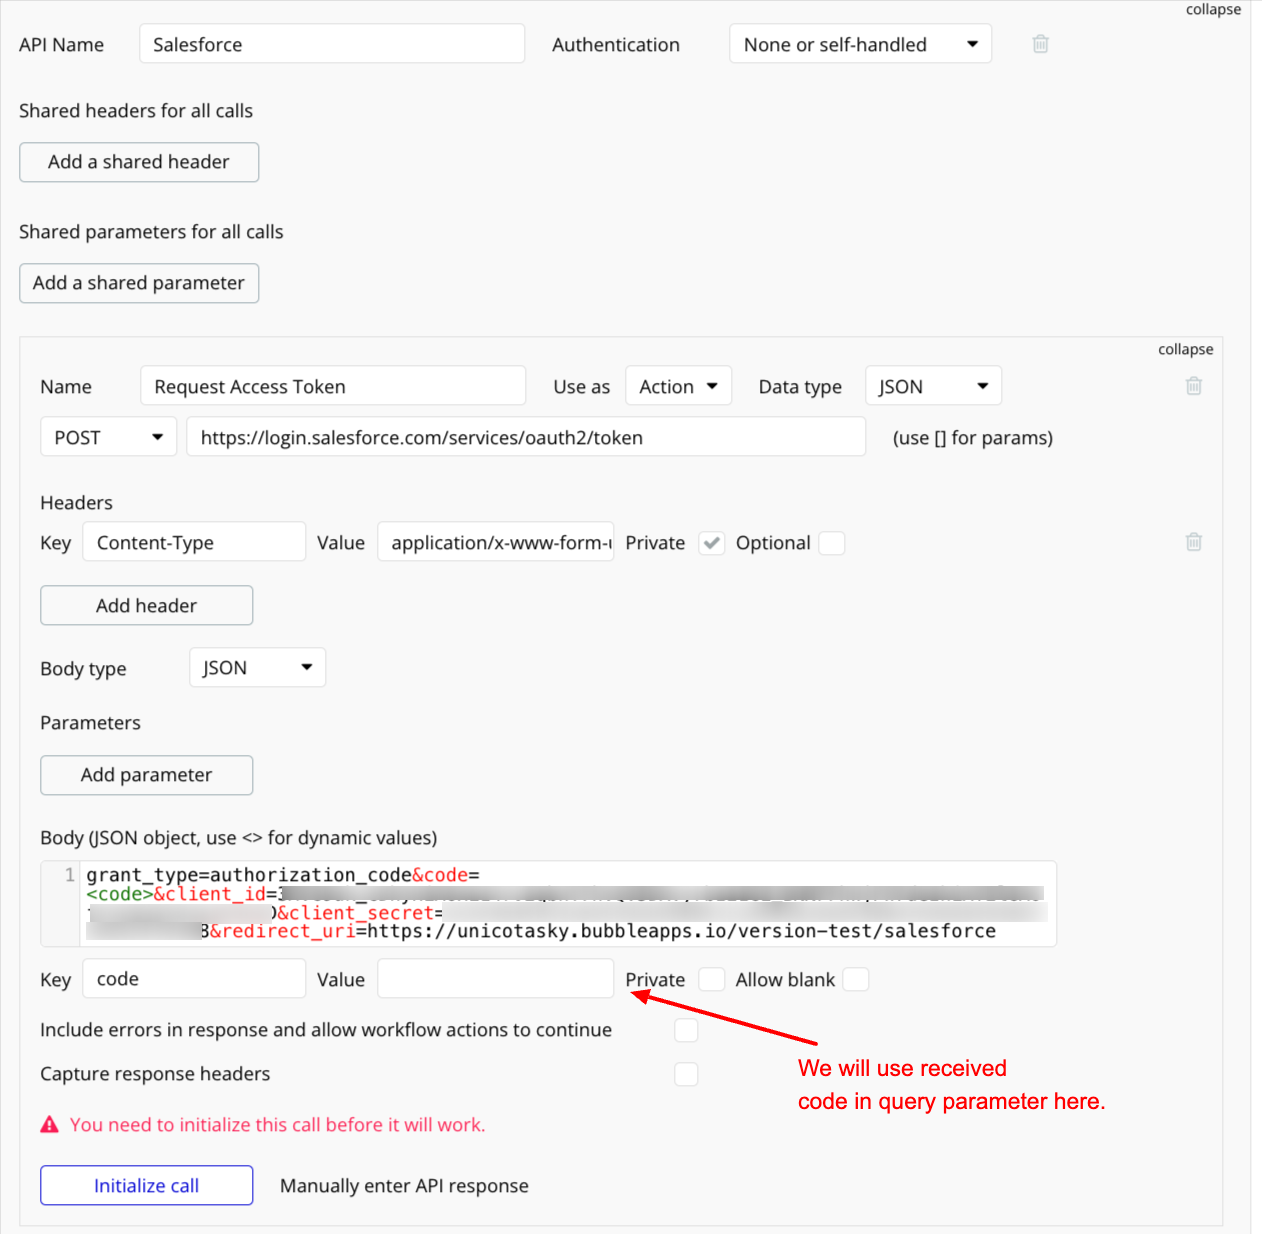
Now put the code here and initialize the call, then save the response.
Make sure to convert the code as URL Parameter to text.
This means code=aPrxI5eherH6PXZaIC0jwHd4ehTG6AIWy5hT6F7Wa10T5A.btFkMQdrYdJ2j.pA714_oiXiw6g%3D%3D
is code=aPrxI5eherH6PXZaIC0jwHd4ehTG6AIWy5hT6F7Wa10T5A.btFkMQdrYdJ2j.pA714_oiXiw6g==
when you are using this in the body of an API call.
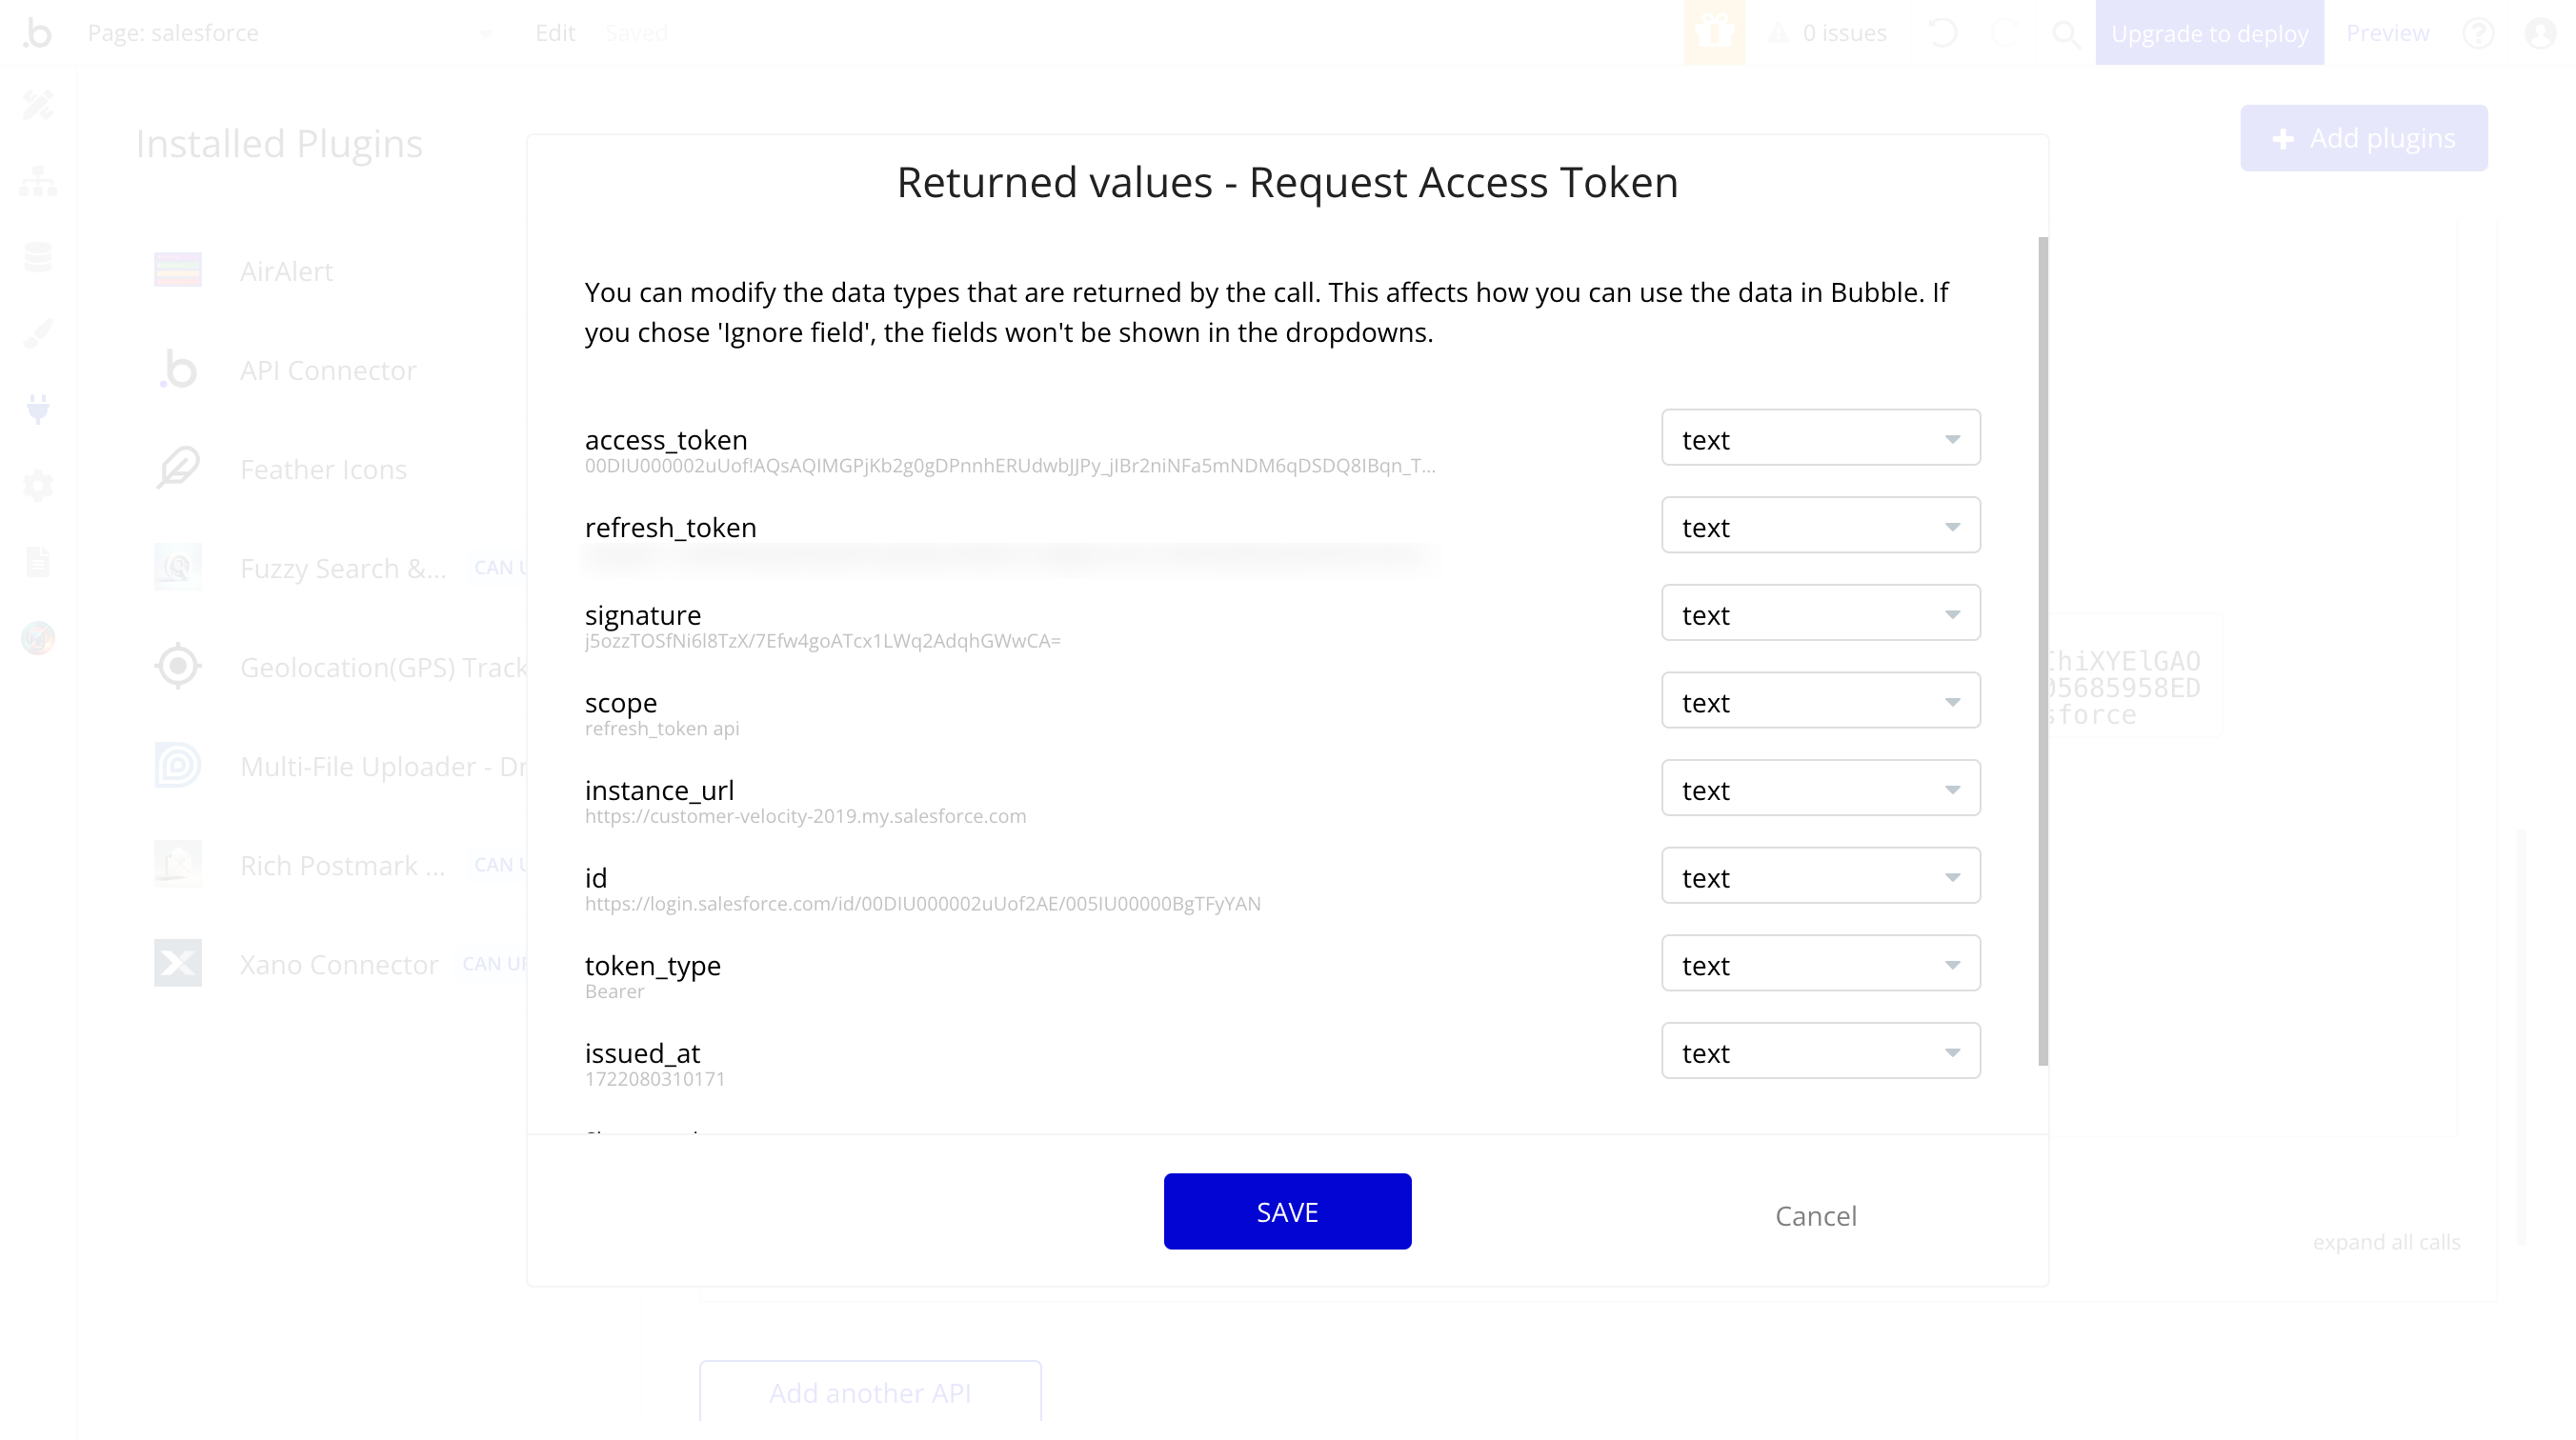
Successfully initialized call will look like this
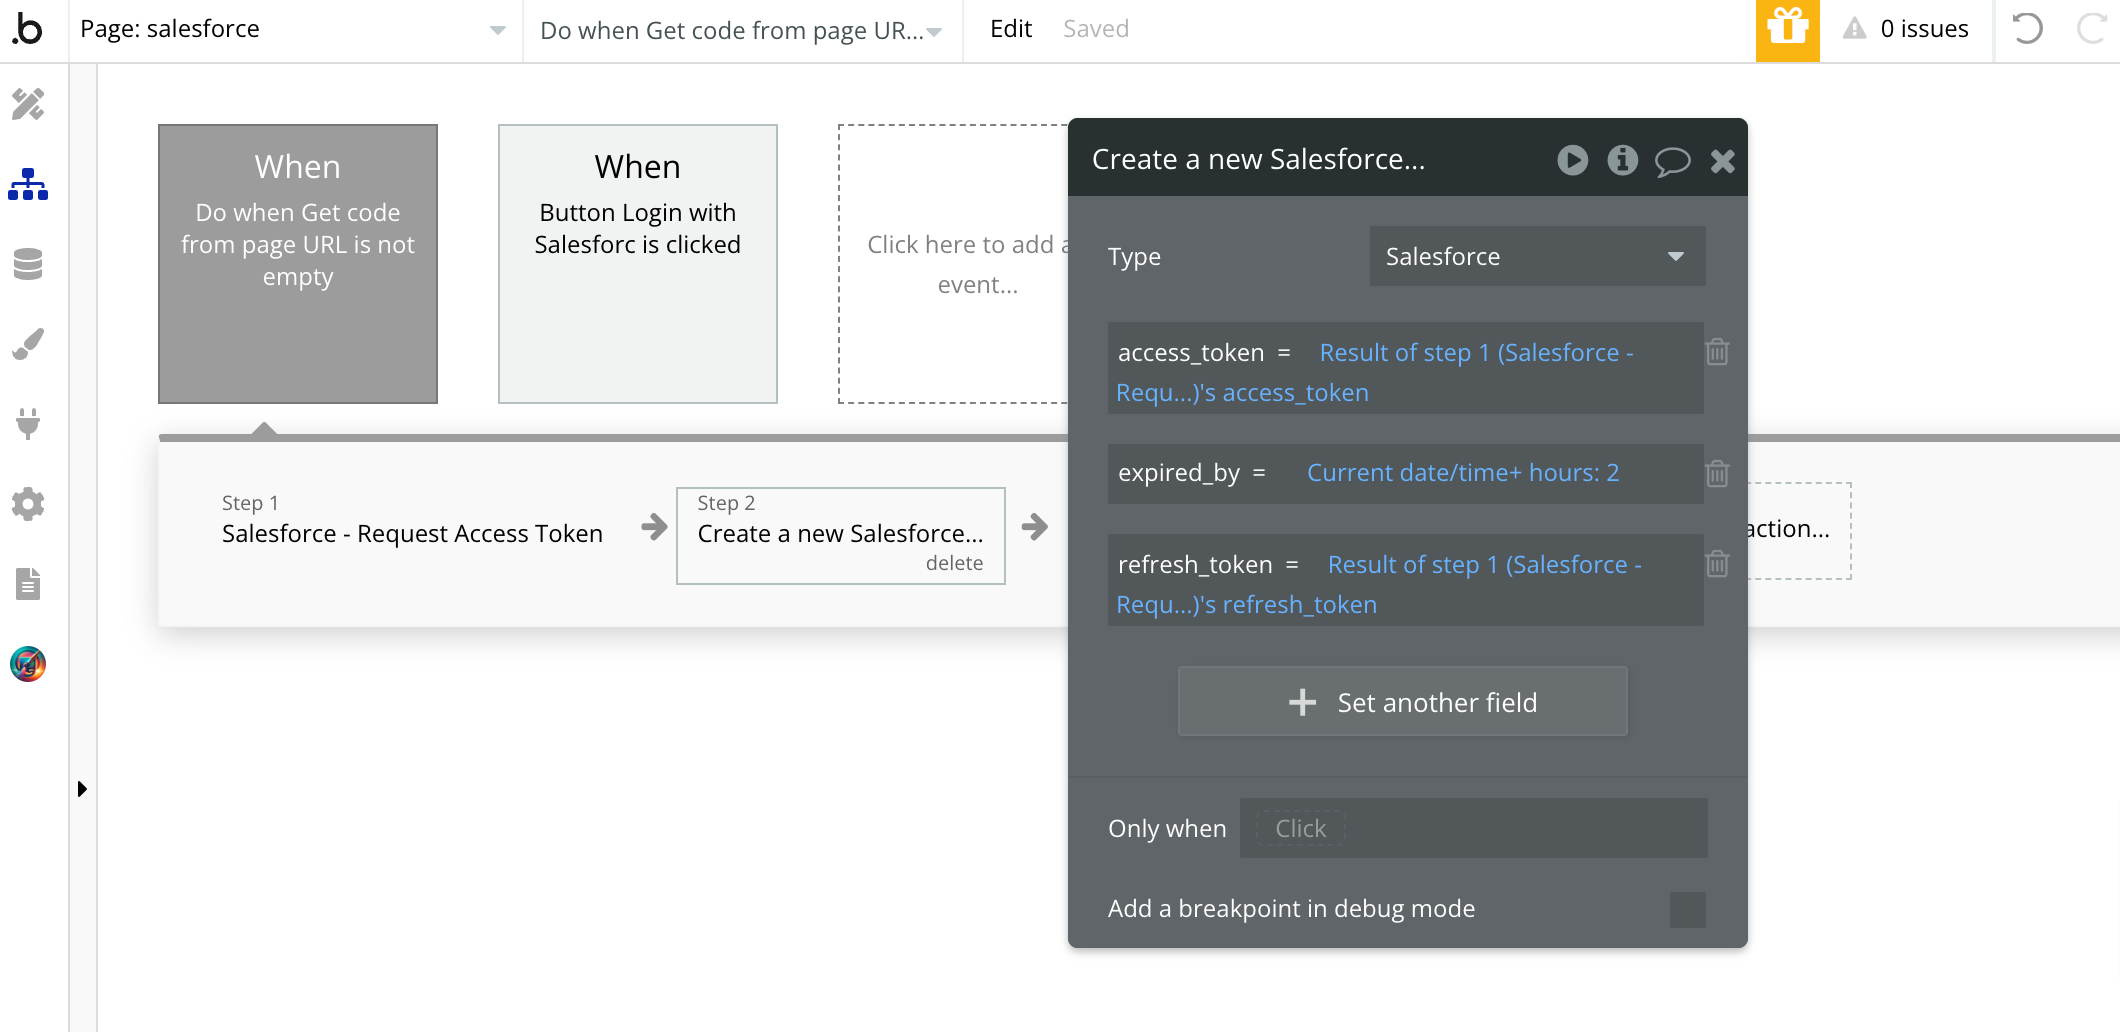
Once initialized, Create a workflow on your redirect URL Page which you can execute either on ‘Page load’ or ‘Do when condition is true’
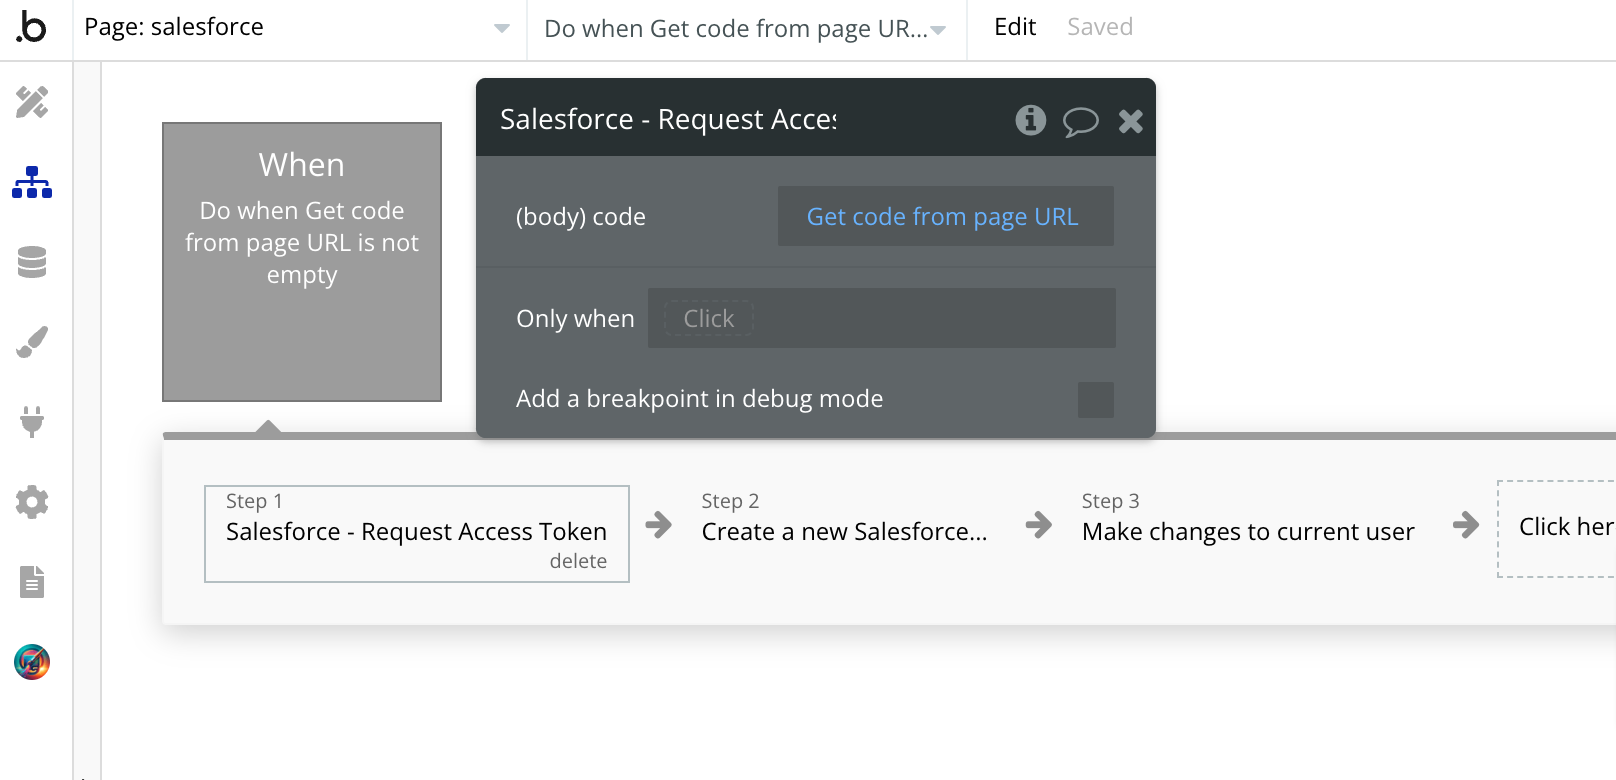
Then I save the response to this action into the database in which I need access, token, refresh token, and expired by. Make sure to protect this data with privacy rules!
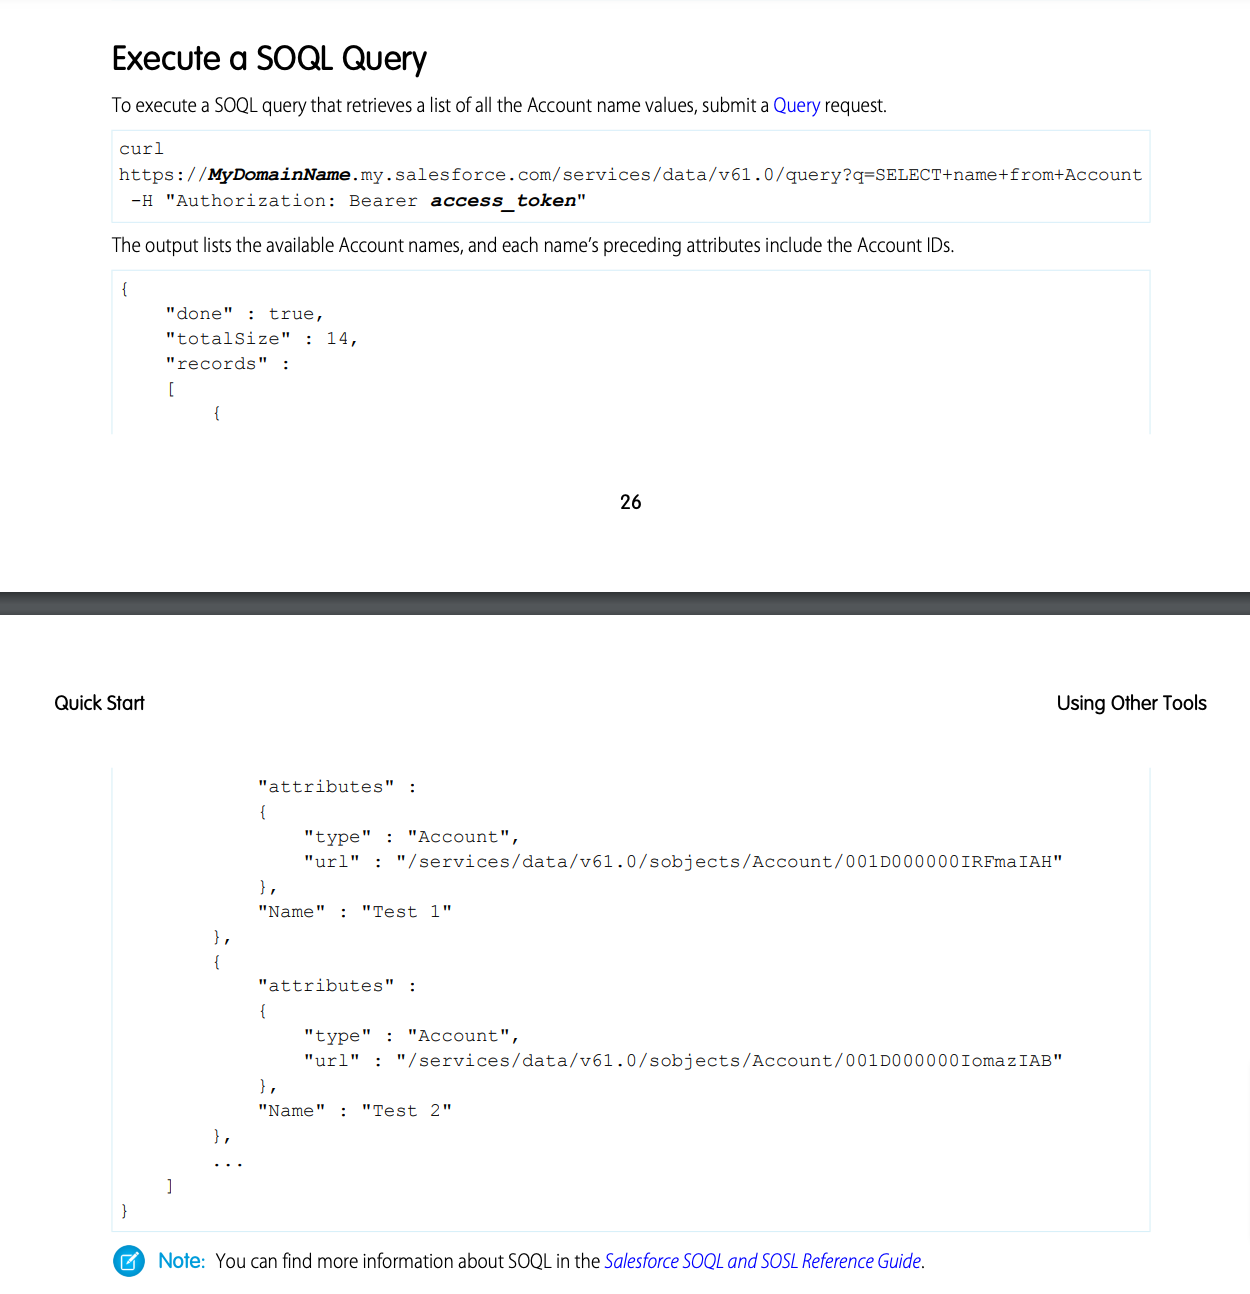
Step 3: Get Data before the access token expires
Here is the Salesforce API Doc reference.
Now Suppose you want to get data on accounts from the salesforce account of your user. You have an access token in DB that is not expired.
Here is the endpoint you need to use for this:
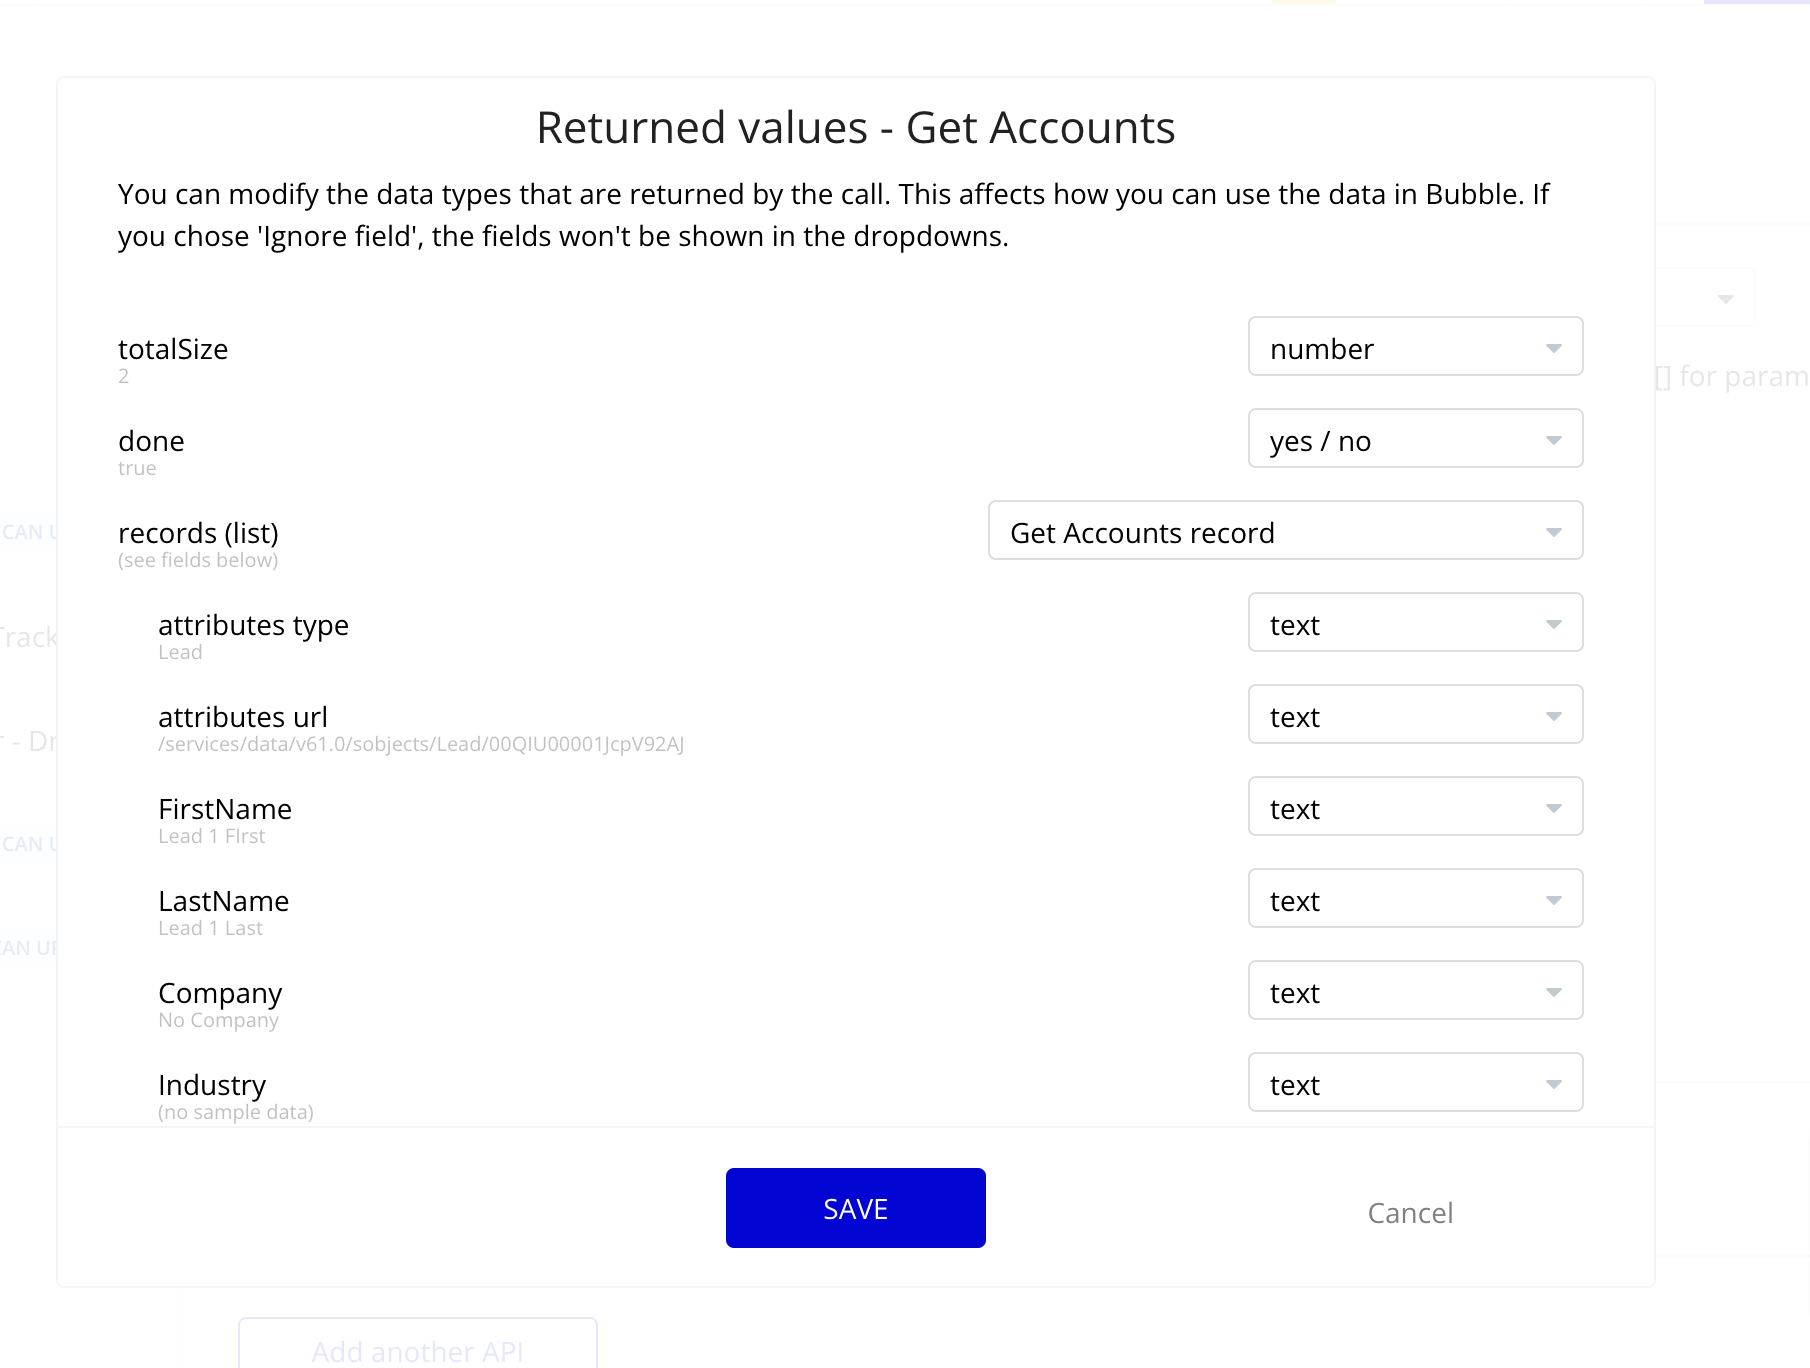
In Bubble, the API Setup will be like this:
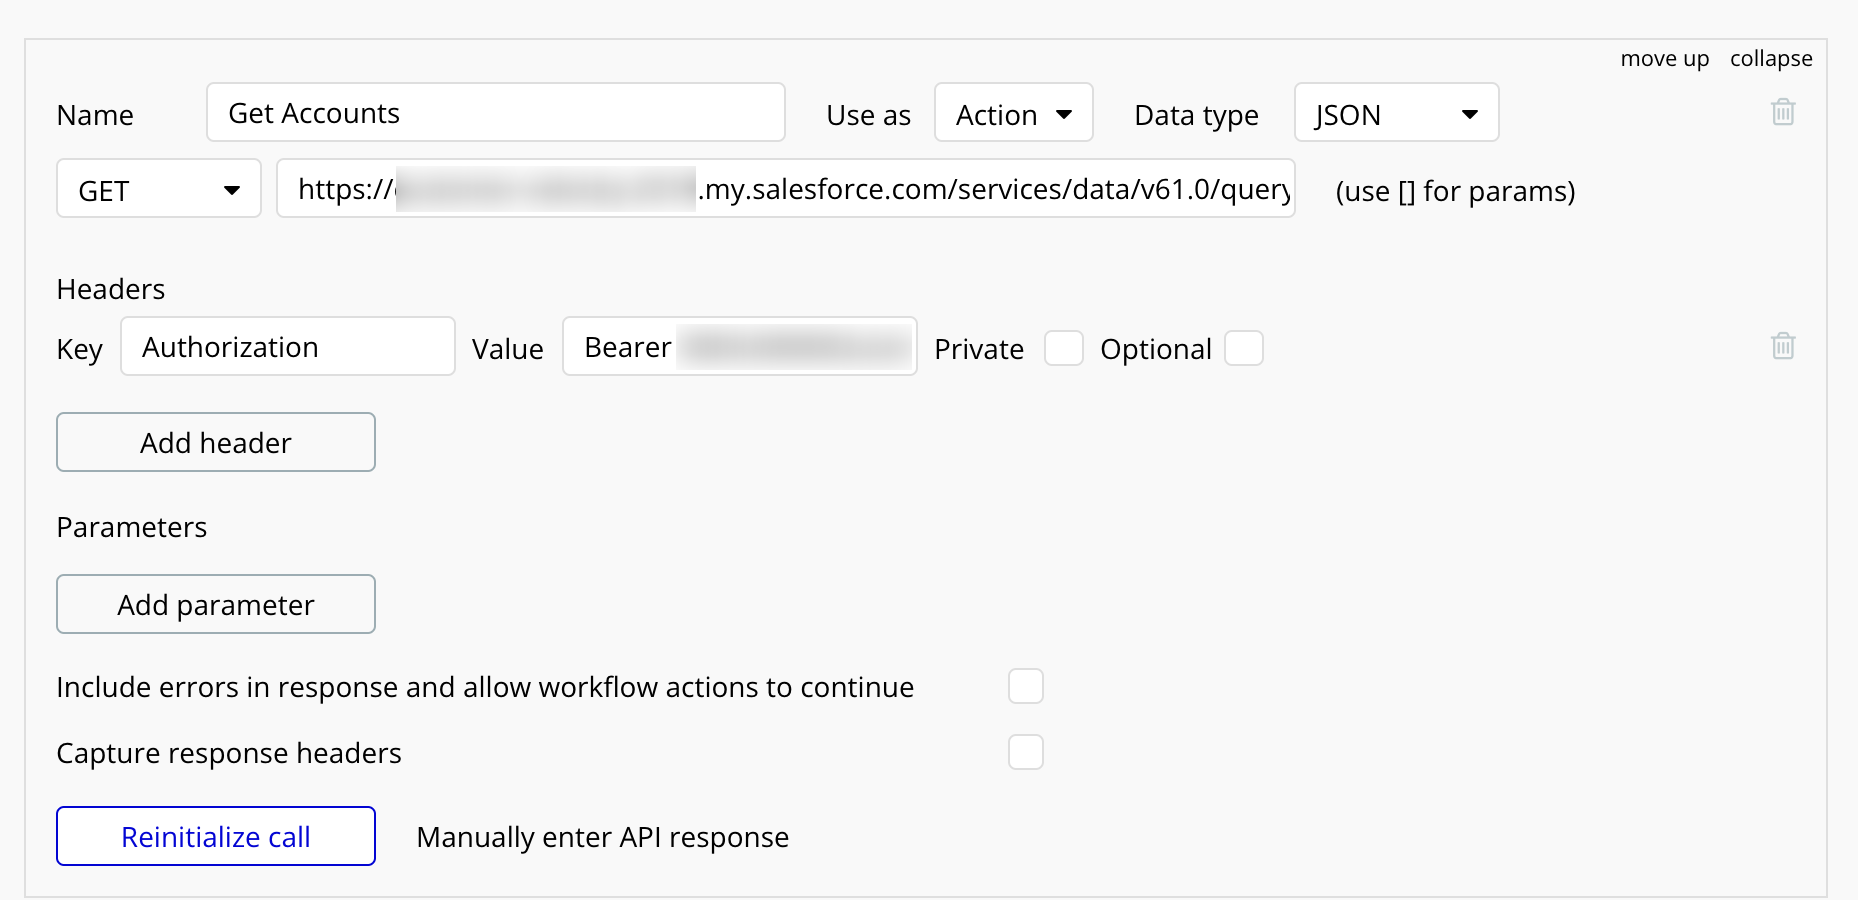
and When successfully initialised call will look like this
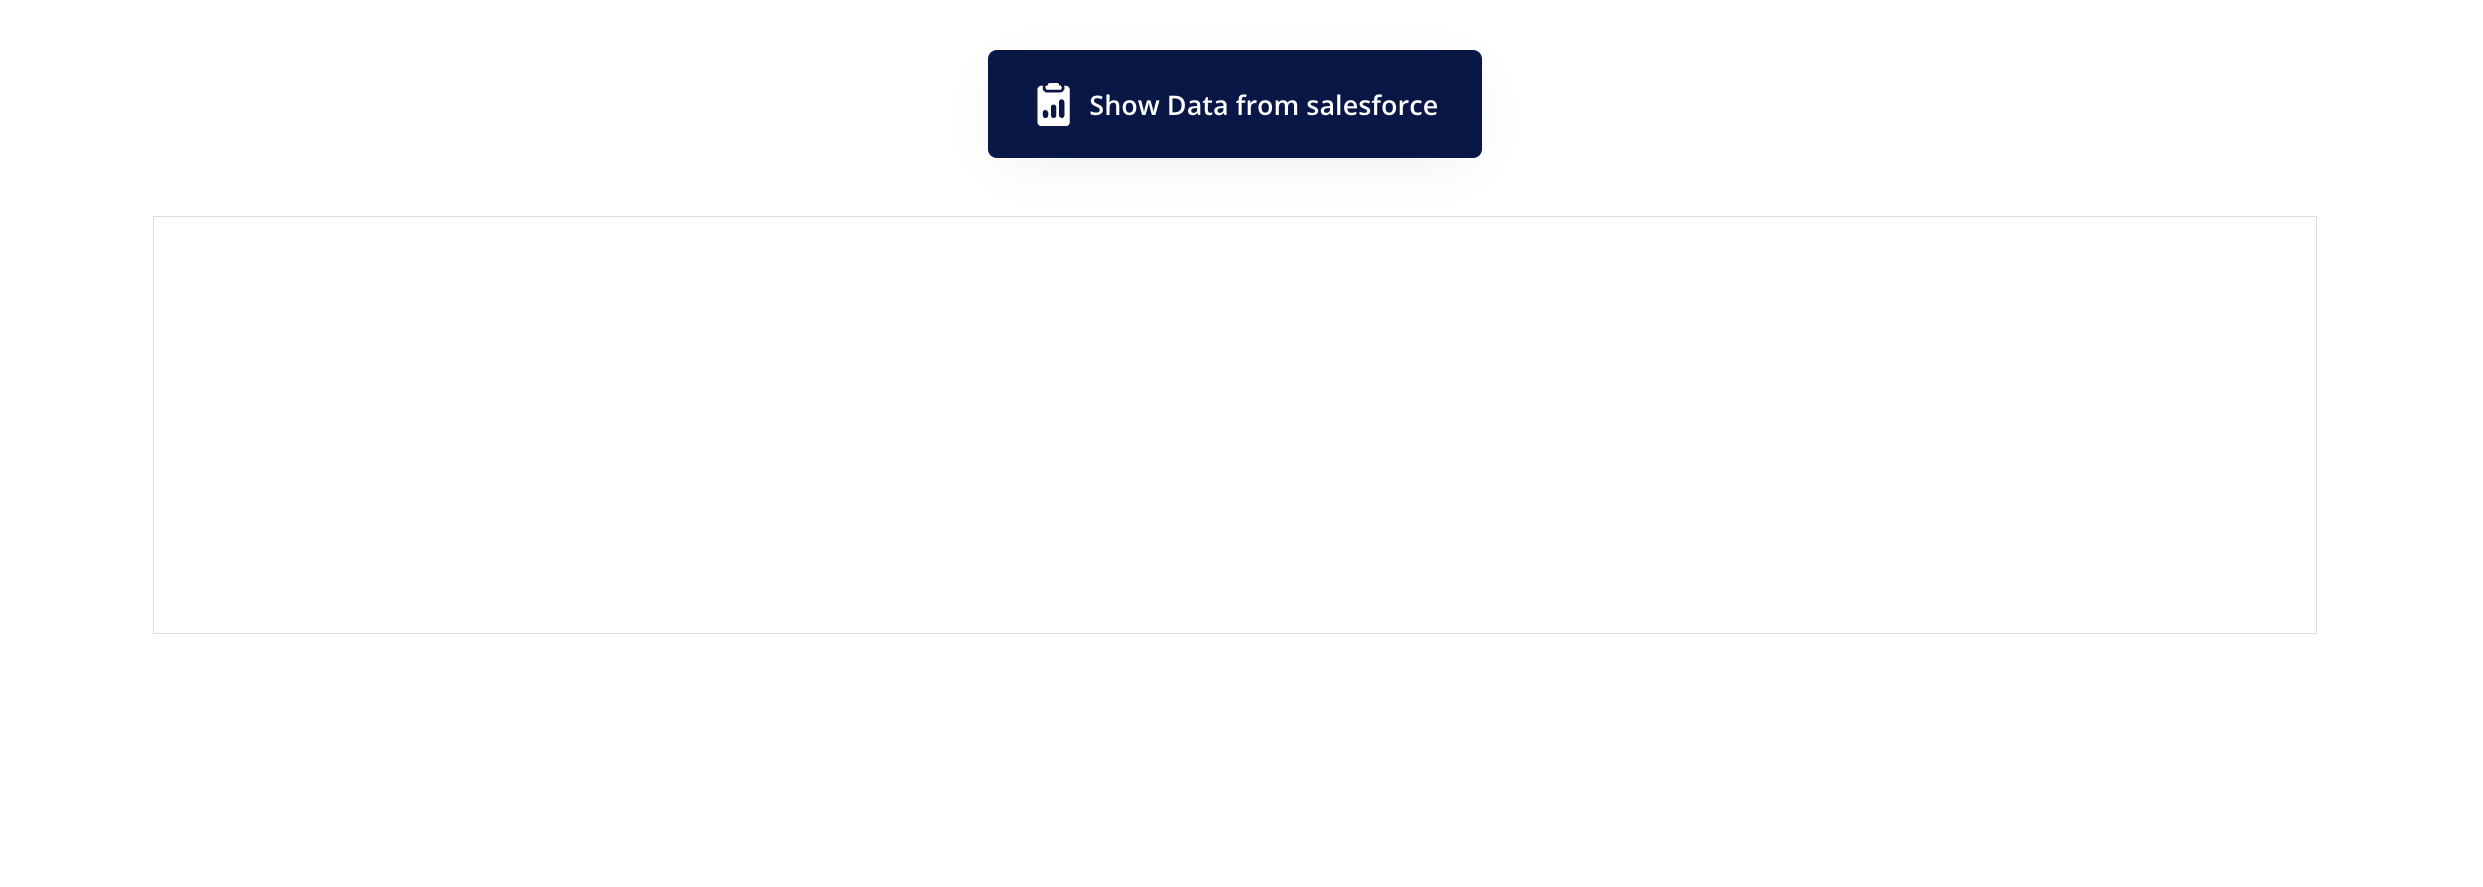
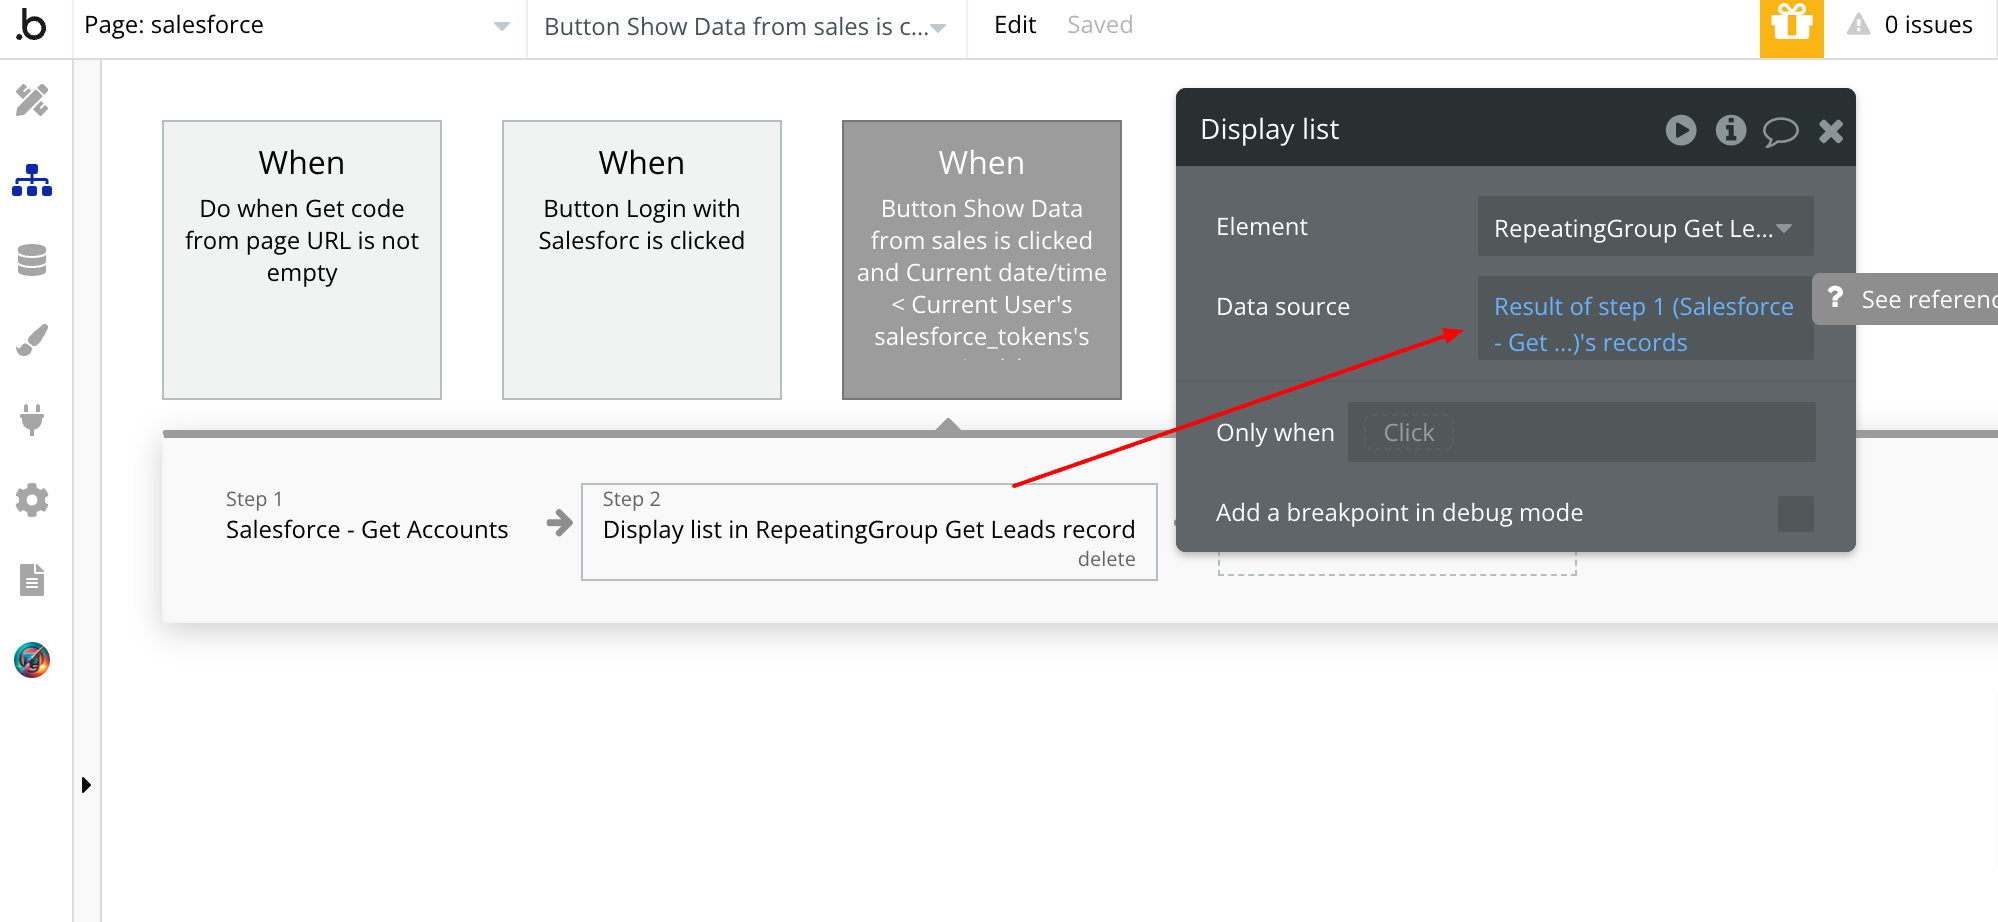
Now I am creating a button which will only show If I have completed Step 2 successfully. As you can see, the data is empty, I haven’t fetched it yet.
Now I am checking whether the token is expired or not.
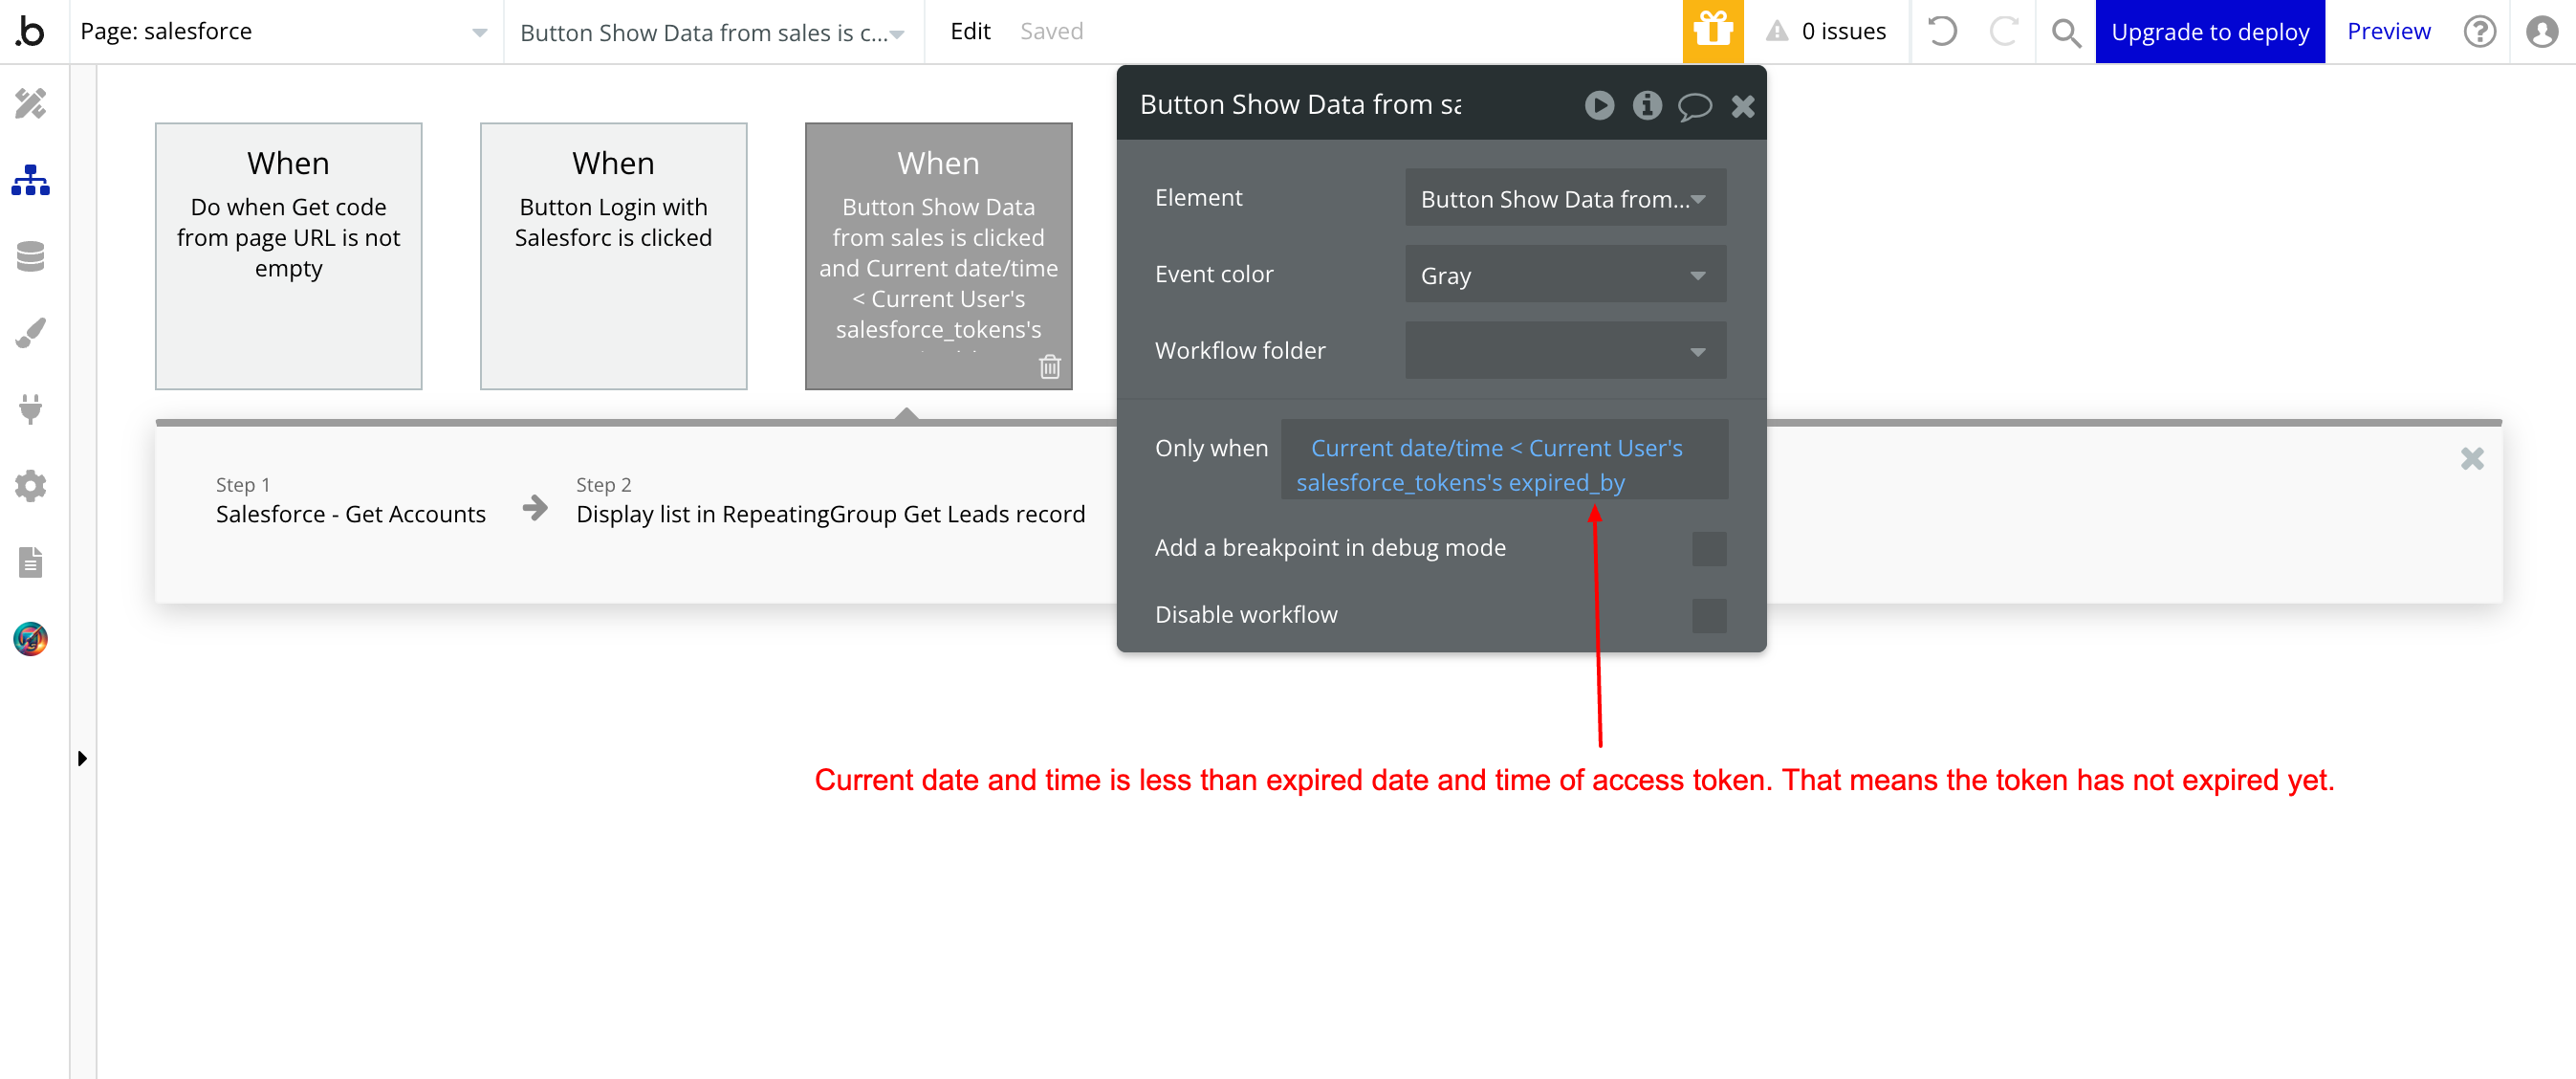
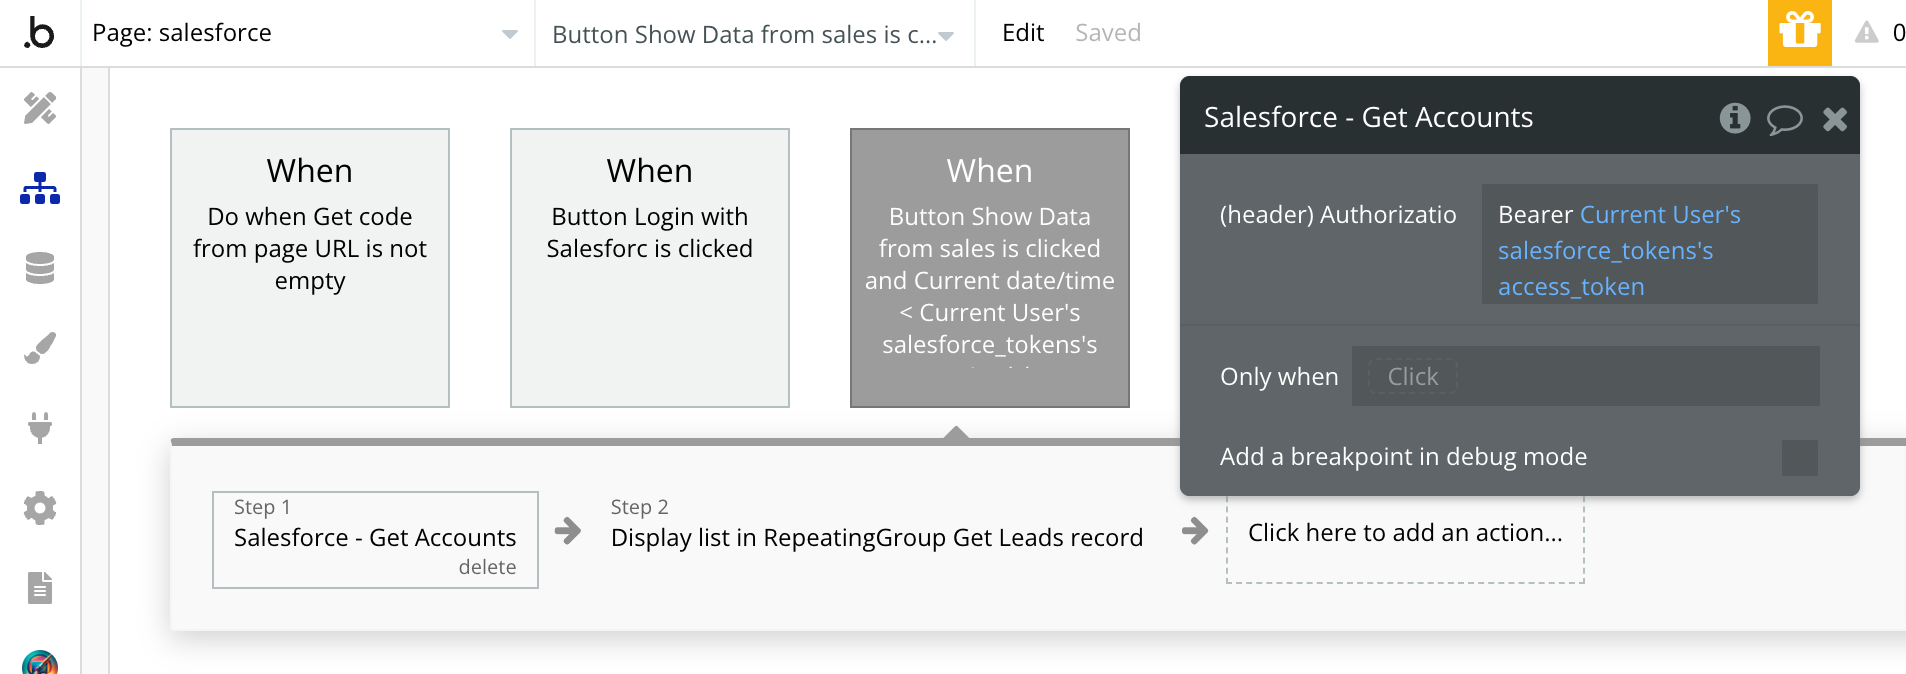
When it is not expired, I will fetch the data from salesforce and show that in Repeating group.
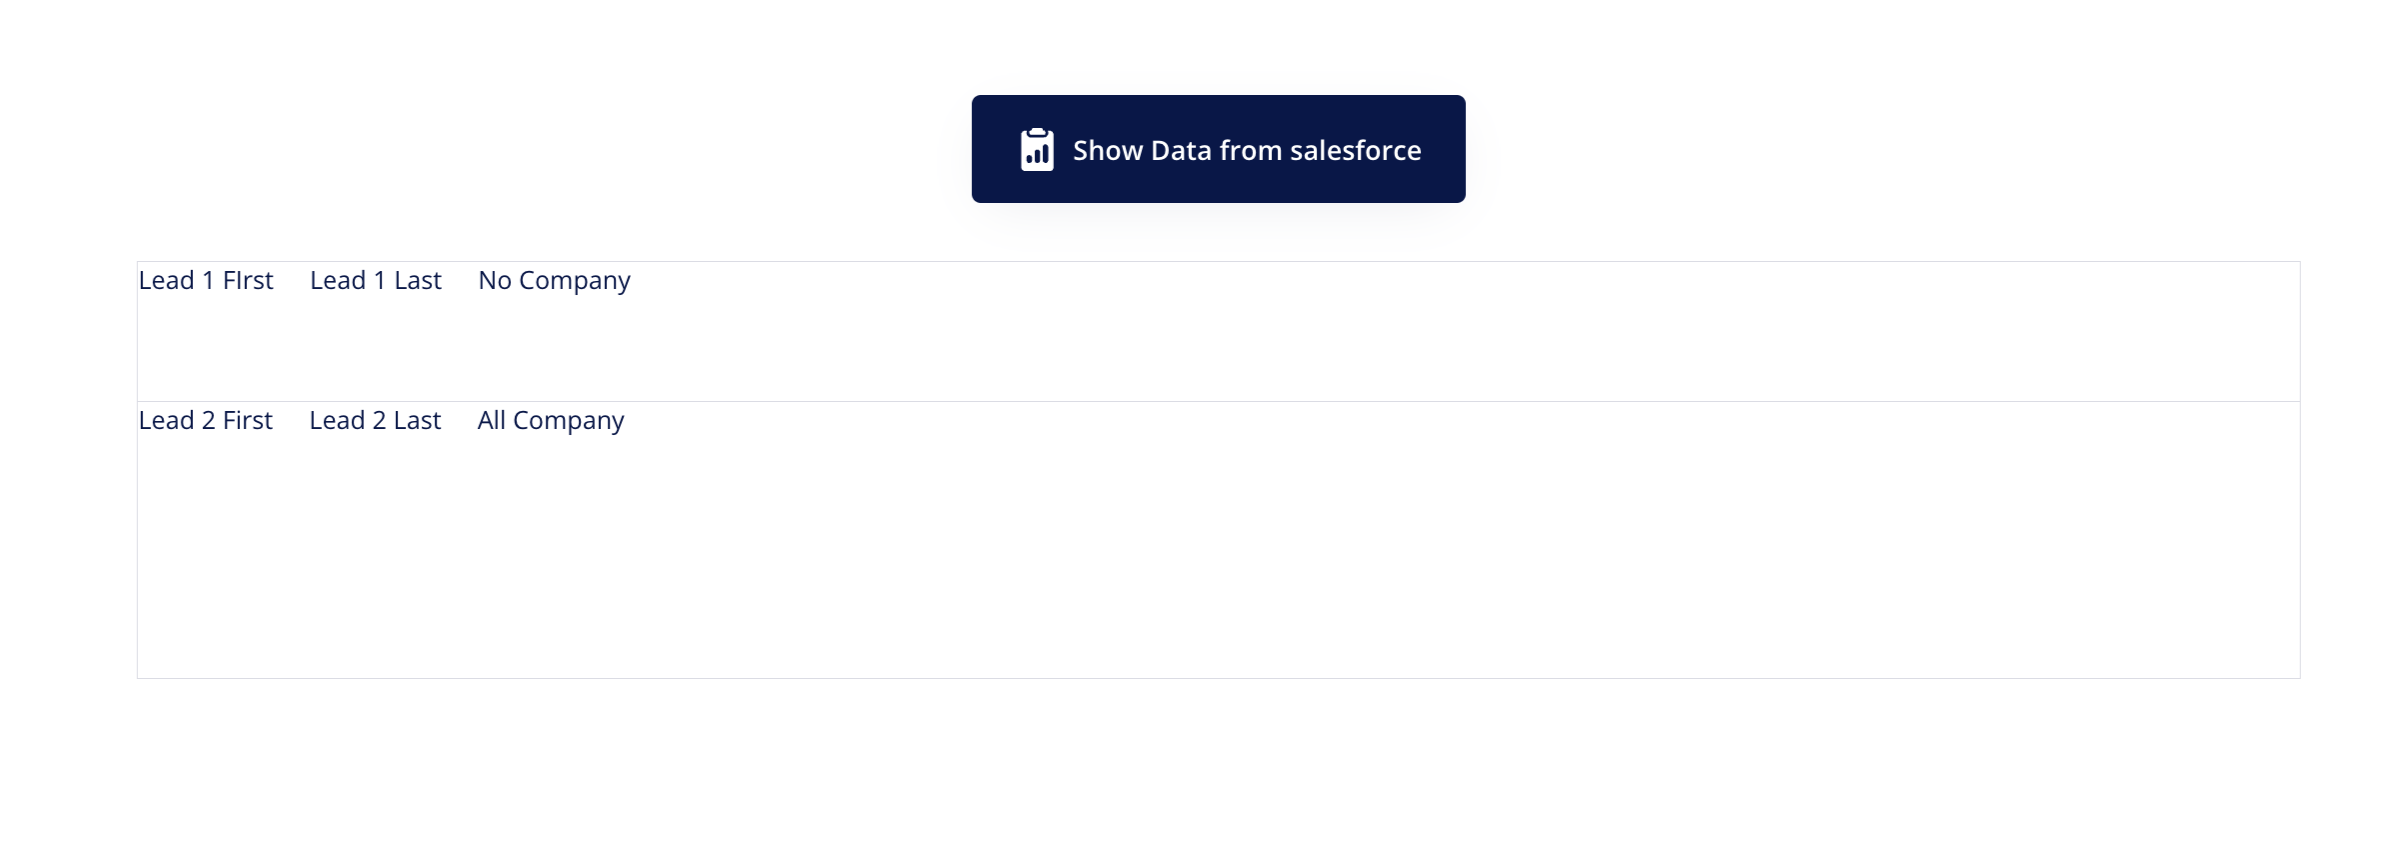
Vola! Data from salesforce is visible now:
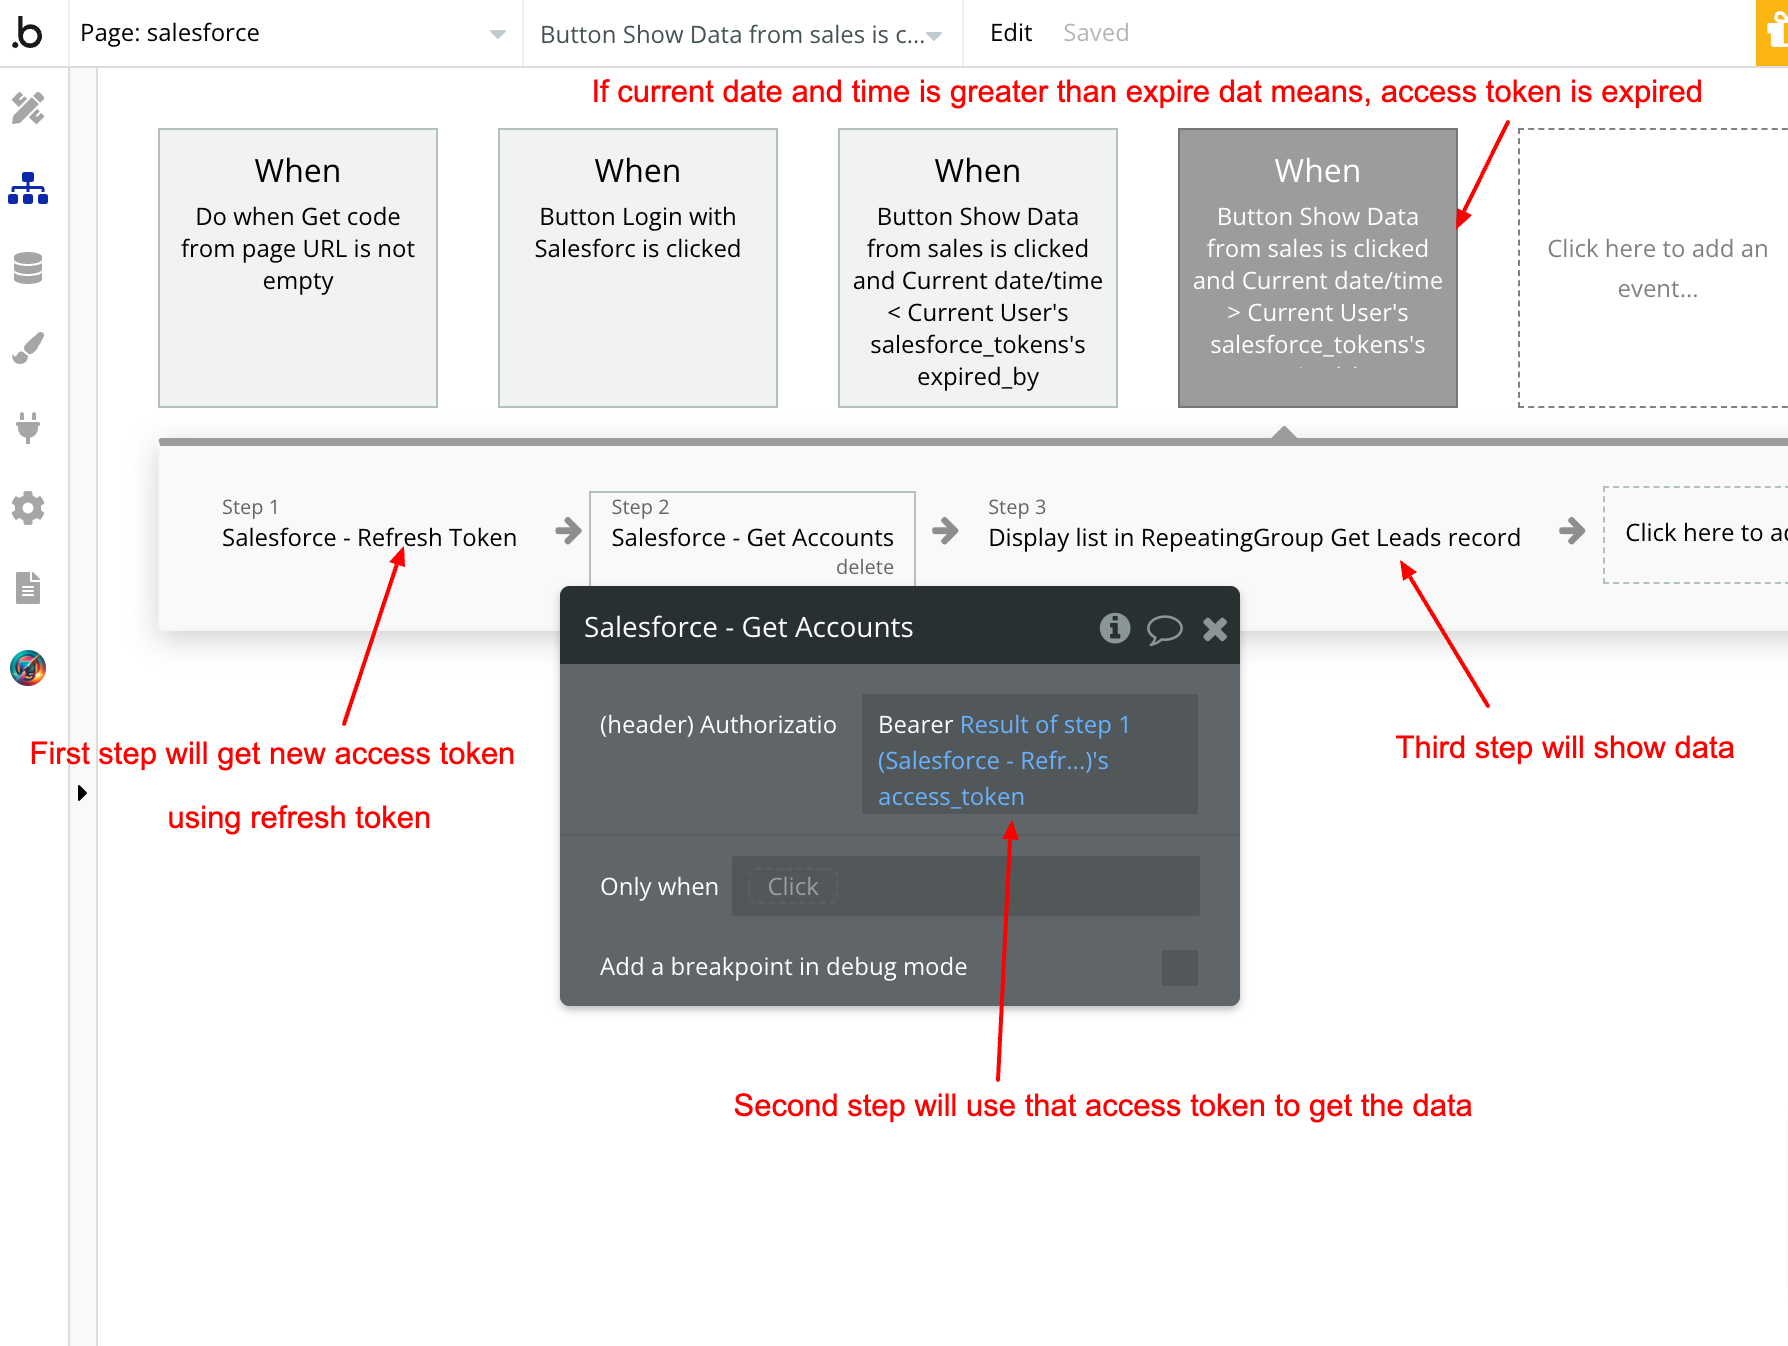
Step 4: Get Data after the access token expires
When you click the button and that time is greater than expire time, it means that access token is expired and we need new access token. So we will use refresh token to get it. Here is what the workflow will look like
This is how OAuth 2 works for all the platforms. There might be minor changes so always refer to API documentation to understand the nitty-gritty of their APIs.
Hope this will help you learn more about OAuth 2 and APIs in Bubble.
Frequently asked questions
What is OAuth 2.0 and why use it in a Bubble.io app?
OAuth 2.0 is a delegation protocol that lets your Bubble app act on behalf of a user at a third-party service (Salesforce, Google, LinkedIn, Zoho) without the user sharing their password with you. Instead, the user authenticates directly with the third party, the third party returns a token to your app, and your app uses that token to make API calls on the user's behalf. Tokens are scoped (you only get permission to do what the user explicitly granted) and time-limited (they expire, forcing periodic refresh). It is the industry-standard way to integrate third-party data into a SaaS product.
How does the OAuth 2.0 flow work in Bubble.io?
Four steps. (1) Your Bubble app redirects the user to the provider's authorization URL with your client_id, redirect_uri, and requested scopes. The user logs in at the provider and approves the requested permissions. (2) The provider redirects the user back to your Bubble app's redirect_uri with a one-time authorization code in the URL. (3) Your Bubble app reads the code from the URL, exchanges it for an access token and refresh token via a POST request to the provider's token endpoint (passing client_id, client_secret, code, and redirect_uri as form-encoded body parameters). (4) Your Bubble app stores the tokens in the database (with privacy rules) and uses the access token to make subsequent API calls.
What is the difference between an OAuth access token and a refresh token?
An access token is a short-lived credential (typically 1 hour) that authorizes API calls on behalf of the user. Every protected API call sends it in the Authorization header as a Bearer token. A refresh token is a long-lived credential (often months or never-expiring) used only to obtain a new access token when the old one expires. Refresh tokens stay on your server (in your database with privacy rules); access tokens are also kept server-side but rotate frequently. The split exists so a leaked access token has limited blast radius (it expires soon) while the refresh token, which lets you keep accessing the user's data indefinitely, stays much more protected.
What is a redirect URI in OAuth 2 and why does it have to be pre-registered?
The redirect URI is the URL the OAuth provider sends the user back to after they approve or deny the authorization request. It is also the URL where the authorization code lands as a query parameter. OAuth providers require you to pre-register this URI in their developer console (in Salesforce, this happens in the Connected App settings) so an attacker cannot trick the provider into sending the authorization code to a malicious URL. The registered URI must match exactly: same domain, same path, same protocol, sometimes case-sensitive. Mismatch is the single most common OAuth setup error.
What does Content-Type application/x-www-form-urlencoded mean in OAuth?
It is a way of encoding key-value pairs in the body of an HTTP POST request as ampersand-separated strings: name=John&age=30&grant_type=authorization_code. OAuth token endpoints almost universally require this content type for the token-exchange request, not JSON, because the OAuth spec predates JSON's dominance and was standardized on form encoding. In Bubble's API Connector, set Content-Type to application/x-www-form-urlencoded and use querystring parameter type for body values; this is the only combination that produces a request the provider will accept.
How do I refresh an expired OAuth access token in a Bubble.io app?
Store the access token's expiry timestamp in the database alongside the token itself. Before every API call, check whether the current time is past expiry. If yes, run a workflow that POSTs to the provider's token endpoint with grant_type set to refresh_token and the stored refresh_token, receives a new access_token (and sometimes a new refresh_token), updates the database row, and only then proceeds with the original API call. Wrap this logic in a custom event so any page or backend workflow can call "ensure-fresh-token" before making a Salesforce (or other) API call. This is the pattern that keeps users authenticated for weeks without re-prompting them to log in.